
Installation Guide
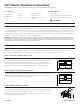


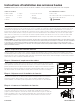
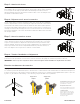
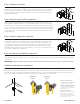
Table Of Contents

10/15/2023 A5170-FRE-Rev 1
Étape 5: Armoires de niveau
Vériez l’armoire pour vous assurer qu’elle est de niveau et d’aplomb. Cale pour combler les
zones inégales entre le sol et la base de l'armoire, ainsi qu'entre le mur et l'arrière de l'armoire.
Le non-respect de cette étape pourrait entraîner des dommages au boîtier. Portez une
attention particulière aux zones que l'armoire sera xée au mur, en vous assurant que le bas
de l'armoire est entièrement soutenu.
Étape 6 : Préparez-vous à ancrer les armoires
Percez l'armoire dans les montants muraux prélocalisés avec un foret de 3∕32" de diamètre,
environ 2" de profondeur. Les trous ne doivent pas s'approcher à moins de 2" de tout bord
vertical intérieur de l'armoire. Deux trous de vis doivent être situés dans la partie supérieure
de l'armoire et deux dans la partie inférieure. Les murs en ciment, en blocs, en brique ou en
carrelage nécessiteront des ancrages pour les vis ou les boulons à bascule. Ceux-ci devront
être achetés séparément, si nécessaire. La taille du trou devra être dimensionnée en fonction
des ancrages achetés.
Étape 7 : Ancrer les armoires au mur
Insérez les vis à tête ronde ronde de 2½" dans les trous jusqu'à ce qu'elles soient presque
serrées. Assurez-vous que le dossier est entièrement soutenu par des cales, si nécessaire,
et qu'il ne s'incline pas dans les imperfections du mur. Assurez-vous que l’armoire est de
niveau et d’aplomb, ajustez-la si nécessaire. Serrez complètement les vis et vériez une fois
de plus que l'armoire est de niveau et d'aplomb. Réinstallez les portes des armoires, les
tiroirs et les étagères une fois que toutes les armoires ont été installées.
Étape 8 : Terminer l'installation et l'alignement
Lorsque toutes les armoires hautes sont solidement installées sur les murs, l’étape suivante consiste à vérier le bon alignement de chaque
porte et tiroir. Si des ajustements sont nécessaires, suivez les instructions de réglage des charnières répertoriées ci-dessous.
IMPORTANT: Toutes les portes et façades de tiroirs doivent être alignées avant l'installation de la quincaillerie décorative.
Entretien et maintenance des armoires
Réglage de la charnière à 6 voies
Les charnières peuvent être facilement ajustées « de haut en bas » en desserrant les vis de charnière xées au cadre facial. Faites glisser la
porte vers le haut ou vers le bas jusqu'à ce qu'elle soit alignée et serrez les vis. Les charnières peuvent également être ajustées «d’un côté
à l’autre» et «de l’intérieur et de l’extérieur». Voir ci-dessous pour plus de détails sur les ajustements.
800022 / A5170 - Rev 0
Step 5: Level Cabinets
Check the cabinet to ensure it is level and plumb. Shim to ll uneven areas between the oor and base of
the cabinet, and between the wall and the back of the cabinet. Failure to do this step could result in damage
to the cabinet. Pay close attention to the areas that the cabinet will attach to the wall, making sure that the
cabinet bottom is fully supported.
Step 6: Prepare To Anchor Cabinets
Drill through the cabinet back into the prelocated wall studs with a
3
∕
32
” diameter drill bit, approximately 2”
deep. The holes should come no closer than 2” to any inside vertical edge of the cabinet. Two screw holes
should be located in the upper section of the cabinet and two in the lower section. Cement, block, brick
or tile walls will require anchors for screws or toggle bolts. These will need to be purchased separately, if
needed. The size of the hole will need to be sized according to those purchased anchors.
Step 7: Anchor Cabinets To Wall
Insert the 2½” round washerhead screws into the holes until they are nearly tight. Make sure the back is fully
supported with shims, as needed, and does not bow into any imperfections in the wall. Ensure that the cabinet
is level and plumb, adjust as needed. Tighten the screws fully and check once more to ensure the cabinet is
level and plumb. Re-install the cabinet doors, drawers and shelving after all cabinets have been installed.
Step 8: Completing the Installation and Alignment
When all of the tall cabinets are securely installed to the walls, the next step is to check each door and drawer for proper alignment.
If adjustments are needed, follow hinge adjustment instructions listed below.
IMPORTANT: All doors and drawer fronts must be aligned prior to decorative hardware installation.
Cabinet Care and Maintenance
6-Way Hinge Adjustment
The hinges can be easily adjusted “up and down” by loosening the hinge screws attached to the face frame. Slide the door up or down until
aligned and tighten the screws. The hinges can also be adjusted “side to side” and “in and out”. See below for details on adjustments.
Shim
Shim
Shim
2"
Min.
Shim
Shim
Shim
2"
Min.
Shim
Shim
Shim
2"
Min.
A. In & Out Adjustment
For bowed and warped doors.
(See illustrations below.)
B. Up & Down Adjustment
For misaligned doors. Loosen screws,
adjust, then re-tighten screws.
C. Side to Side Adjustment
For gaps between double doors.
Clockwise to adjust out, counter
clockwise to adjust in.
A A
B B
C C
D D
FULL OVERLAY PARTIAL OVERLAY
Superposition
complète
Superposition
partielle
A. Ajustement d'entrée et de sortie
Pour portes courbées et déformées.
(voir illustrations ci-dessous)
B. Ajustement haut et bas
Pour portes mal alignées. Desserrez
les vis, ajustez, puis resserrez les vis.
C. Réglage latéral
Pour les espaces entre les portes
doubles. Dans le sens des aiguilles
d’une montre pour régler, dans le
sens inverse des aiguilles d’une
montre pour régler.
Cale
Cale