
Installation Guide
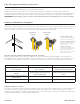


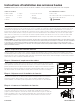
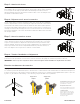
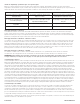
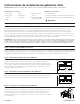
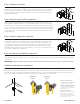
Table Of Contents

10/15/2023 A5170-ESP-Rev 1
Instrucciones de instalación de gabinetes altos
PRECAUCIÓN: Nunca utilice clavos para montar los gabinetes. El uso de clavos puede anular la garantía de fábrica, escrita o implícita.
Antes de comenzar la instalación
Estas instrucciones están destinadas a ser una referencia complementaria para quienes tienen las habilidades y la experiencia adecuadas
para instalar gabinetes de manera segura y exitosa, incluida la familiaridad con los principios básicos de carpintería y el uso seguro y
adecuado de herramientas. El marco y la construcción de las paredes pueden variar mucho y es posible que estas instrucciones no
describan todos los métodos de construcción. Además, puede haber líneas eléctricas, de plomería, de gas u otros servicios públicos
detrás de la pared, por lo que se debe evitar el contacto durante la instalación. Si por algún motivo después de leer estas instrucciones no
se siente seguro de poder instalar este gabinete de manera segura y exitosa, comuníquese con un contratista autorizado para realizar la
instalación. MasterBrand Cabinets no es responsable de una instalación incorrecta o daños a la propiedad.
ADVERTENCIA: Las líneas eléctricas, de plomería, de gas y otros servicios públicos con frecuencia se instalan o incrustan detrás de las paredes donde se
instalan los gabinetes. Antes de perforar agujeros o colocar tornillos, asegúrese de no hacer contacto con ninguna de estas utilidades. El incumplimiento
de estas instrucciones puede provocar daños a la propiedad y lesiones graves o mortales. Si no confía en su capacidad para garantizar que no entrará en
contacto con los servicios públicos detrás de una pared durante la instalación, comuníquese con un contratista autorizado para instalar los gabinetes.
Paso 1: Inspeccionar gabinetes nuevos
Todos los gabinetes se someten a inspecciones de calidad antes de salir de fábrica y se empaquetan cuidadosamente para evitar daños durante
el envío y la manipulación. Desafortunadamente, ocasionalmente pueden ocurrir daños en el manejo entre la fábrica y el destino nal. Inspeccione
cada gabinete cuidadosamente. Si descubre daños, vuelva a colocar el gabinete en la caja y notique al minorista sobre la compra.
Paso 2: Determinar la ubicación del gabinete
Retire el zócalo y otros objetos en el área de la pared donde se instalarán los gabinetes.
Usando una regla y un nivel, encuentre el punto alto en el piso donde se instalarán los
gabinetes. Desde el punto alto, marque una línea horizontal nivelada en cada pared donde
se colocarán los gabinetes. Desde las líneas de nivel, marque otra línea horizontal paralela de
84” para las alturas de los gabinetes altos. La parte superior de los gabinetes bajos, altos y
de pared se ubicará en estas marcas.
Paso 3: Prepárese para la instalación del gabinete
Ubique los montantes con un detector de montantes y marque dónde se instalarán los
gabinetes. Retire todas las puertas, cajones y estantes ajustables de los gabinetes antes de
la instalación. Esto reducirá el peso y permitirá un acceso más fácil durante la instalación.
Paso 4: Comience la instalación del gabinete
Comience a instalar los gabinetes bajos en la esquina (si corresponde). Siga las instrucciones
del gabinete base y avance hacia el gabinete alto. Usando abrazaderas, alinee y una los
gabinetes adyacentes en los marcos frontales. Asegúrese de que los marcos de la cara
se alineen tanto en la cara como verticalmente. Con una broca de 3∕32”, taladre oricios
iniciales a través de los marcos frontales cerca de la parte superior e inferior. Inserte y apriete
los tornillos de 2½”.
Herramientas necesarias:
• Cinta métrica
• Buscador de
estudios
• Nivel
• Lápiz
• Abrazaderas
• Cuadrado
• Taladrar con broca
de 3∕32”
• Destornillador Phillips
y broca para taladro
Materiales necesitados:
• Cuñas de madera
• Tornillos para madera con cabeza plana o moldurada de 2½”
• Tornillos para madera con cabeza de arandela redonda de 2½”
800022 / A5170 - Rev 0
Tall Cabinet Installation Instructions
CAUTION: Never use nails to mount cabinets. The use of nails may void your factory warranty, written or implied.
Before starting the installation
These instructions are intended as supplemental reference for those who have the appropriate skills and experience to safely and
successfully install cabinetry, including familiarity with basic carpentry principles and safe and proper tool use. Wall framing and construction
can vary greatly, and these instructions may not describe all construction methods. Also, there may be electric, plumbing, gas lines or other
utilities behind the wall, for which contact must be avoided during installation. If for any reason after reading these instructions you do not
feel condent in the ability to safely and successfully install this cabinetry, please contact a licensed contractor for installation. MasterBrand
Cabinets is not responsible for improper installation or property damage.
WARNING: Electric, plumbing, gas lines and other utilities, are frequently installed or embedded behind walls where cabinets are being installed. Before
drilling any holes or driving any screws, be sure you will not be making contact with any of these utilities. Failure to follow these instructions may result in
property damage and serious or fatal injury. If you do not feel condent in your ability to insure that you will not make contact with utilities behind a wall
during installation, please contact a licensed contractor to install the cabinets.
Step 1: Inspect New Cabinets
All cabinets are subjected to quality inspections before leaving the factory, and have been carefully packaged to prevent damage during
shipping and handling. Unfortunately, damage may occur occasionally in handling between the factory and the nal destination. Inspect
each cabinet carefully. If damage is discovered, place the cabinet back into the carton and notify retailer of purchase.
Step 2: Determine Cabinet Placement
Remove baseboard and other objects on the wall area where the cabinets are to be installed. Using a
straight edge and a level, nd the high point in the oor where the cabinets are to be installed. From the high
point, mark a level horizontal line on each wall where the cabinets will be attached. From the level lines, mark
another parallel level horizontal line 84” for the tall cabinet heights. The top of the base, tall & wall cabinets
will be located at these marks.
Step 3: Prepare For Cabinet Installation
Locate the studs with a stud nder and mark where the cabinets are to be installed. Remove all the doors,
drawers and adjustable shelving from the cabinets before installation. This will reduce weight and allow
easier access during installation.
Step 4: Begin Cabinet Installation
Start installing the base cabinets in the corner (if applicable). Follow the base cabinet instructions and work
towards the tall cabinet unit. Using clamps, align and join the adjacent cabinets together at the face frames.
Make sure that the face frames align both on the face and vertically. With a
3
∕
32
” drill bit, drill starter holes
through the face frames near the top and bottom. Insert and tighten the 2½” screws.
Shim
Shim
Shim
2"
Min.
Use level to
draw line
Floor not
level
High point
Level
54″
35″
84″
54″
35″
Stud marks
84″
Tools Needed:
• Tape Measure
• Stud Finder
• Level
• Pencil
• Clamps
• Square
Materials Needed:
• Wood Shims
• 2½” Trim Head or Flat Head Wood Screws
• 2½” Round Washer Head Wood Screws
• Drill with
3
∕
32
” Bit
• Phillips Head Screwdriver
and drill driver bit
Usa el nivel para
dibujar una línea
Punto álgido
Piso no
nivelado
Nivel
Marcas de montantes