
Installation Guide

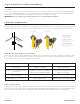
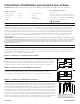
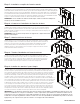
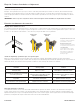
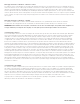

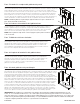
Table Of Contents

10/15/2023 A5171-ENG-Rev 1
Step 5: Complete Wall Cabinet Installation
Continue the wall cabinet installation by placing the next cabinet on the wall at the predetermined
reference, using clamps to clamp the cabinet face frames together rmly. Be careful to line up the
bottom horizontal edges. With a 3∕32" drill bit, drill starter holes through the face frames near the top
and bottom. Insert and tighten the screws. (Note: Utilize 2" trim head or at head wood screws if
installing DC2430 cabinet). Check cabinet with a level on the cabinet front, sides and bottom. Shim
where necessary. Once the cabinet is level and plumb, tighten all the installation screws and remove
the clamps. Continue installing the rest of your wall cabinets in the same manner.
NOTE: If installing a single wall cabinet, follow instructions shown in Step #9 for proper installation.
Step 6: Begin Base Cabinet Installation
Once the wall cabinets have been installed, the base cabinets can then be installed.
Start installing the base cabinets in the corner (if applicable). Using the clamps, align
and join the cabinets together at the face frames. Make sure that the face frames align
both on the face and vertically. Follow Step 5 for attaching face frames.
NOTE: For lazy susan cabinets, counter top supports must be added as shown.
Step 7: Level Base Cabinets
Check the cabinet, ensuring that it is level and plumb. Shim to ll uneven areas between
the oor and base of the cabinet, and between the wall and the back of the cabinet.
Failure to do this step could result in damage to the cabinet. Drill through the cabinet
back into prelocated wall studs with a 3∕32" diameter drill bit, approximately 2" deep. The
hole should come no closer than 2" to any inside vertical edge of the cabinet.
Step 8: Complete Base Cabinet Installation
Insert the 2½” round washerhead screws into the holes until they are nearly tight. Make
sure the back is fully supported with shims as needed, and does not bow into any
imperfections in the wall. Ensure the cabinet is level and plumb and adjust as needed.
Tighten the screws fully, and recheck to verify that the cabinets are level and plumb.
Step 9: Install Single Wall Cabinets
Follow Steps 2 & 3 for preparing the wall for the single cabinet. The cabinet should be located on the
wall, so that the prelocated studs that will be used for attachment do not fall within 2" of the inside
vertical edges of the cabinet. Ensure that the cabinet is level and plumb and shim to ll uneven areas
between the wall and the back of the cabinet. Failure to do so could result in damage to the cabinet.
Pay close attention to the locations that the cabinet will attach to the wall, making sure that there are no
voids. Drill through the cabinet back or hanging rails, into prelocated stud(s) using a 3∕32" diameter bit,
2" deep in a minimum of 4 places. The holes should be no closer than 2" and no further than 12" from
any inside vertical edge. The holes should also be located at the top and bottom of the back. The use of
2½” round washer head screws is required. Cement, block, brick or tile walls will require anchors for the
screws. These will need to be purchased separately if needed. Insert screws into the holes until they are
nearly tight. Make sure that the cabinet back is fully supported with shims as needed, and does not bow
with any imperfections found in the wall. Conrm that the cabinet is level and plumb, adjust as needed.
Tighten the screws down and recheck that the cabinet is level and plumb.
IMPORTANT: Structural modications of a wall cabinet can signicantly weaken the cabinet. For this reason modications
are not recommended, such as cutting the back to clear wall obstructions. If an obstruction exists, we suggest you rst try
to use cabinet(s) that do not require modications. If modication is required, the warranty of the cabinet is void and it is the
responsibility of the installer to take appropriate steps to compensate for any loss of strength or support due to the modication.
Shim
Shim
countertop
supports
countertop
supports
countertop
supports
Shi
m
Shim
countertop
supports
countertop
supports
countertop
supports
Shim
Shim
countertop
supports
countertop
supports
countertop
supports