
Installation Guide
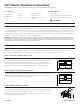


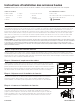
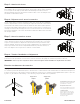
Table Of Contents

10/15/2023 A5170-ESP-Rev 1
Paso 5: Gabinetes nivelados
Revise el gabinete para asegurarse de que esté nivelado y aplomado. Calce para rellenar áreas
irregulares entre el piso y la base del gabinete, y entre la pared y la parte posterior del gabinete.
No realizar este paso podría provocar daños al gabinete. Preste mucha atención a las áreas en
las que el gabinete se unirá a la pared, asegurándose de que la parte inferior del gabinete esté
completamente apoyada.
Paso 6: Prepárese para anclar los gabinetes
Taladre a través del gabinete hasta los montantes de la pared preubicados con una broca de
3∕32” de diámetro y aproximadamente 2” de profundidad. Los oricios no deben estar a menos
de 2” de cualquier borde vertical interior del gabinete. Deben ubicarse dos oricios para tornillos
en la sección superior del gabinete y dos en la sección inferior. Las paredes de cemento, bloques,
ladrillos o tejas requerirán anclajes para tornillos o pernos de palanca. Estos deberán comprarse
por separado, si es necesario. El tamaño del oricio deberá dimensionarse de acuerdo con los
anclajes adquiridos.
Paso 7: Anclar los gabinetes a la pared
Inserte los tornillos con cabeza de arandela redonda de 2½” en los oricios hasta que estén
casi apretados. Asegúrese de que la parte posterior esté completamente apoyada con cuñas,
según sea necesario, y que no se doble en ninguna imperfección de la pared. Asegúrese de
que el gabinete esté nivelado y aplomado, ajústelo según sea necesario. Apriete los tornillos
completamente y verique una vez más para asegurarse de que el gabinete esté nivelado y
aplomado. Vuelva a instalar las puertas de los gabinetes, los cajones y los estantes después de
que se hayan instalado todos los gabinetes.
Paso 8: Completar la instalación y alineación
Cuando todos los gabinetes altos estén instalados de forma segura en las paredes, el siguiente paso es vericar que cada puerta y
cajón estén alineados correctamente. Si es necesario realizar ajustes, siga las instrucciones de ajuste de las bisagras que se enumeran a
continuación.
IMPORTANTE: Todas las puertas y frentes de cajones deben estar alineados antes de la instalación de los accesorios decorativos.
Cuidado y mantenimiento del gabinete
Ajuste de bisagra de 6 vías
Las bisagras se pueden ajustar fácilmente “hacia arriba y hacia abajo” aojando los tornillos de las bisagras jados al marco frontal. Deslice
la puerta hacia arriba o hacia abajo hasta que quede alineada y apriete los tornillos. Las bisagras también se pueden ajustar “de lado a
lado” y “hacia adentro y hacia afuera”. Consulte a continuación para obtener detalles sobre los ajustes.
800022 / A5170 - Rev 0
Step 5: Level Cabinets
Check the cabinet to ensure it is level and plumb. Shim to ll uneven areas between the oor and base of
the cabinet, and between the wall and the back of the cabinet. Failure to do this step could result in damage
to the cabinet. Pay close attention to the areas that the cabinet will attach to the wall, making sure that the
cabinet bottom is fully supported.
Step 6: Prepare To Anchor Cabinets
Drill through the cabinet back into the prelocated wall studs with a
3
∕
32
” diameter drill bit, approximately 2”
deep. The holes should come no closer than 2” to any inside vertical edge of the cabinet. Two screw holes
should be located in the upper section of the cabinet and two in the lower section. Cement, block, brick
or tile walls will require anchors for screws or toggle bolts. These will need to be purchased separately, if
needed. The size of the hole will need to be sized according to those purchased anchors.
Step 7: Anchor Cabinets To Wall
Insert the 2½” round washerhead screws into the holes until they are nearly tight. Make sure the back is fully
supported with shims, as needed, and does not bow into any imperfections in the wall. Ensure that the cabinet
is level and plumb, adjust as needed. Tighten the screws fully and check once more to ensure the cabinet is
level and plumb. Re-install the cabinet doors, drawers and shelving after all cabinets have been installed.
Step 8: Completing the Installation and Alignment
When all of the tall cabinets are securely installed to the walls, the next step is to check each door and drawer for proper alignment.
If adjustments are needed, follow hinge adjustment instructions listed below.
IMPORTANT: All doors and drawer fronts must be aligned prior to decorative hardware installation.
Cabinet Care and Maintenance
6-Way Hinge Adjustment
The hinges can be easily adjusted “up and down” by loosening the hinge screws attached to the face frame. Slide the door up or down until
aligned and tighten the screws. The hinges can also be adjusted “side to side” and “in and out”. See below for details on adjustments.
Shim
Shim
Shim
2"
Min.
Shim
Shim
Shim
2"
Min.
Shim
Shim
Shim
2"
Min.
A. In & Out Adjustment
For bowed and warped doors.
(See illustrations below.)
B. Up & Down Adjustment
For misaligned doors. Loosen screws,
adjust, then re-tighten screws.
C. Side to Side Adjustment
For gaps between double doors.
Clockwise to adjust out, counter
clockwise to adjust in.
A A
B B
C C
D D
FULL OVERLAY PARTIAL OVERLAY
Superposición
completa
Superposición
parcial
A. Ajuste de entrada y salida
Para puertas arqueadas y alabeadas.
(ver ilustraciones a continuación)
B. Ajuste hacia arriba y hacia abajo
Para puertas desalineadas. Aoje
los tornillos, ajuste y luego vuelva a
apretar los tornillos.
C. Ajuste de lado a lado
Para espacios entre puertas dobles.
En el sentido de las agujas del reloj
para ajustar hacia afuera y en el
sentido contrario a las agujas del reloj
para ajustar hacia adentro.
Calce
Calce