
Installation Guide
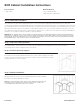
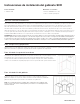
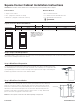
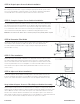

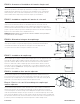
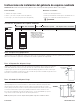
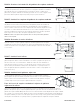
Table Of Contents

STEP 4: Begin Square Corner Cabinet Installation
Position the square corner cabinet and the adjacent cabinet in place with reference to the
ller and pull specication table on page 1. Setting the appropriate amount of pull is critical
for a successful installation. Conrm the square corner cabinet is sitting level and plumb. If
needed, add shims to level. Remove adjacent cabinet to allow room for install.
STEP 5: Complete Square Corner Cabinet Installation
Locate predetermined wall studs and transfer marks to the inside of the cabinet. Drill through
the cabinet back and into the wall stud with a 3/32” diameter drill bit, approximately 2” deep.
The holes should come no closer than 2” to any inside vertical edge of the cabinet. Insert the
2 ½” round washer head screws into the holes until they are nearly tight. Check to ensure the
cabinet remained level and plumb. Adjust as needed before fully tightening the screws.
NOTE: Never use nails to mount cabinets. The use of nails may void your factory warranty, written or implied.
STEP 6: Determine Filler Width
Following your design layout, place the adjacent cabinet next to the square corner base
cabinet that has been installed. The width of the ller, Z, can now be determined in
accordance with the specication table on page 1 and your design layout. Rip ller to
desired width if necessary.
STEP 7: Filler Installation
With the ller at the desired width, clamp ller to the appropriate side of the adjacent cabinet
face frame. Align the ller vertically to the frame and ensure the face of the ller is ush with
the face of the frame. Drill two 3/32” diameter holes through the face frame and into the ller
near the top and bottom. Then, insert and tighten 2 ½” trim head or at head wood screws to
fasten the ller to the adjacent cabinet frame. (NOTE: If ller width is less than one inch, use
shorter screws).
STEP 8: Adjacent Cabinet Installation
Position the adjacent cabinet and ller assembly in place. Check the cabinet to ensure it is
both level and plumb using shims if necessary. Make sure the ller is properly aligned to the
square corner cabinet face frame. Follow Step 5 to secure the adjacent cabinet to the wall.
Step 9: Attach Square Corner to Filler/Adjacent Cabinet Assembly
After the adjacent cabinet has been secured to the wall, use clamps to securely join the cabinets
together. Ensure the ller and adjacent cabinet assembly is still properly aligned to the square corner
cabinet. Mark two locations on the inside of the square corner cabinet face frame that coincides
with the center of the ller. Drill two 3/32” diameter holes through the square corner cabinet face
frame and into the ller near the top and bottom. Then, insert and tighten 2 ½” trim head or at head
wood screws to fasten the ller and adjacent cabinet to the square corner cabinet.
(6.18.13) SCB INSTRUCTIONS A5131
STEP 5
STEP 6
STEP 7
Attach the blind panel to the face frame
using the recommended (8) #6 x 1/2" flat
head screws. These screws must be
purchased separately. Reattach the door
and drawer front to the cabinet.
Place the predrilled blind panel onto the
face frame using the markings placed on
the face frame in the last step. Mark the
predrilled hole locations from the blind
panel onto the face frame. Remove the
blind panel and predrill the face frame (8)
places with a 7/64" diameter drill bit, 1/2"
deep.
Position the Square Corner Base cabinet
with reference to the specifications on
page one. Do not secure to the wall yet.
SQUARE CORNER
CABINET
ADJACENT
CABINET
Z
Y
X
Filler Board
Wall
=Open Space
MARK
(8) HOLE
LOCATIONS
ONTO THE
FACE FRAME.
Attach panel to the face frame
using the (8) #6 x 1/2"
flat head screws.
(6.18.13) SCB INSTRUCTIONS A5131
STEP 8
STEP 9
STEP 10
Measure from the corner to the first wall stud mark.
Transfer this measurement to the inside of the wall corner
cabinet. Mark the placement of the next wall stud. Drill
through the wall cabinet back into the prelocated studs
with a 3/32" diameter drill bit, approximately 2" deep. The
holes should be positioned 3/4" down from the inside top
of the cabinet but should come no closer than 2" to any
inside vertical edge of the cabinet. Cement, block, brick,
or tile walls will require anchors for screws or toggle bolts.
These will need to be purchased separately if needed.
Insert #10 x 2 1/2" screws into the holes until they are
nearly tight. Do not tighten the screws until you have
finished all final leveling and shimming as needed. Check
the front sides and tops of all cabinets with a level. After
the cabinet is level and plumb, tighten the installation
screws.
NOTE: Never use nails to mount cabinets. The use of
nails may void your factory warranty, written or implied.
Once the square corner base cabinet is positioned in step
5, confirm that the cabinet is sitting level and straight.
Remove the adjacent cabinet to allow for room to install
the square corner base cabinet. If needed, add shims to
level the cabinet.
Level
Following your design layout, replace the adjacent cabinet
next to the square corner base cabinet that has been
installed. The width of the filler, Z, can now be determined
in accordance with the specifications on page one and
your design layout.
*Filler Board is located under cabinet with Blind Cover
Panel.
SQUARE CORNER
CABINET
ADJACENT
CABINET
Z
Y
X
Filler Board
Wall
=Open Space
10/15/2023 A5168-ENG-Rev 1
(6.18.13) SCB INSTRUCTIONS A5131
STEP 11
STEP 12
STEP 13
With the adjacent cabinet removed, the Filler Board
can be clamped to the square corner cabinet in the
position marked in the previous step. Drill two 3/32”
holes into the filler board through the face frame of
the cabinet. Then use 2 #8 cabinet screws of the
appropriate length depending on the width of your
filler board if you cut to fit your design layout. If the
Filler Board’s width was not cut down, use 2” long
#8 cabinet screws.
Once the square corner cabinet has been installed,
the adjacent base cabinets can now be installed.
Start installing the base cabinets in the corner.
Using clamps, align and join the cabinets together
at the face frames. Make sure that the face frames
align both on the face and vertically.
Check the cabinet to ensure it is level and plumb.
Shim to fill uneven areas between the floor and
base of the cabinet and between the wall and the
back of the cabinet. Failure to do this step could
result in damage to the cabinet.
Follow Step 9 to secure adjacent cabinet to the
wall.
With the adjacent cabinet positioned next to the
installed square corner cabinet, mark the location
of the filler board on the inside of the square corner
cabinet face frame.
SQUARE CORNER
CABINET
ADJACENT
CABINET
Filler Board
Wall
=Open Space
Pencil
SQUARE CORNER
CABINET
Filler Board
Wall
Clamp
Shims