
Installation Guide
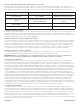
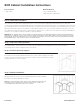
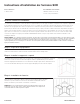
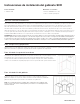
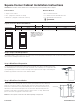
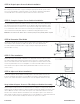

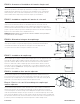
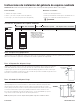
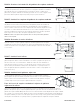
Table Of Contents

Paso 1: inspección y preparación
Siga las instrucciones del gabinete de pared y base para inspeccionar el gabinete y preparar y marcar las paredes para la instalación del
gabinete. Instale todos los gabinetes de pared antes de instalar el gabinete de esquina SCB.
Paso 2: Preparación del panel ciego
Ubique y retire el panel ciego y el relleno de la parte inferior del gabinete. Deje el relleno a un lado para
usarlo más adelante. Recorte el panel ciego de modo que cubra el lado abierto del gabinete de la
esquina ciega a 1/2" en todos los (4) lados de la abertura. Marque (8) ubicaciones de los oricios que
se muestran en la imagen a la derecha a ¼" de los bordes de la persiana. Pretaladre las (8) ubicaciones
marcadas con una broca de 3/32” de diámetro.
Paso 3: Instalación del panel ciego
En el lado de la abertura de la esquina cuadrada del marco frontal (abertura sin la puerta
adjunta), marque líneas en el marco frontal a ½” del borde de la abertura de la puerta. Esto
ubicará el panel ciego para su jación. Coloque el panel ciego preperforado en el marco
frontal y marque las ubicaciones de los oricios previamente perforados desde el panel ciego
en el marco frontal. Retire el panel ciego y taladre previamente el marco frontal con una
broca de 3/32” de diámetro en todas las (8) ubicaciones, a ½” de profundidad. Fije el panel
ciego al marco frontal usando (8) tornillos de cabeza plana #6 x ½”.
NOTA: La puerta se puede colocar a cualquier lado del gabinete según las necesidades de diseño.
NOTA: Para determinar la
superposición de su gabinete,
consulte la imagen de la
izquierda que muestra la
cobertura frontal de la puerta
y el cajón del marco frontal.
(6.18.13) SCB INSTRUCTIONS A5131
STEP 2
STEP 3
STEP 4
The blind panel will need to be trimmed to size to fit
over the opening of your square corner base cabinet.
Then the blind panel will need to be drilled for
installation. Mark the (8) hole locations shown to the
right on the blind panel. All holes should be located
1/4" from edges of blind panel. Drill the (8)
premarked locations with a 7/64" diameter drill bit
through the panel.
*Panel is located under cabinet with Filler Board
Locate the studs with a stud finder and mark where
the cabinets are to be installed. Remove all the doors
and drawers from the cabinets before installation.
Measure the area to confirm that the kitchen design
used will work.
Remove door and drawer from square corner
cabinet. On the square corner opening side
of the face frame (opening without door
attached), a line 1/2” from the edge of the
opening needs to be marked onto the face
frame. This will locate the blind panel for
attachment.
NOTE: Door can be placed on either side of
the cabinet depending on design needs.
DOOR LOCATION
FACE FRAME
1/2
1/2
1/2
1/2
Información del gabinete de esquina cuadrada:
Superposición
completa
Superposición
parcial
Instrucciones de instalación del gabinete de esquina cuadrada
PRECAUCIÓN: Nunca utilice clavos para montar los gabinetes. El uso de clavos puede anular la garantía de fábrica, escrita o implícita.
(6.18.13) SCB INSTRUCTIONS A5131
STEP 2
STEP 3
STEP 4
The blind panel will need to be trimmed to size to fit
over the opening of your square corner base cabinet.
Then the blind panel will need to be drilled for
installation. Mark the (8) hole locations shown to the
right on the blind panel. All holes should be located
1/4" from edges of blind panel. Drill the (8)
premarked locations with a 7/64" diameter drill bit
through the panel.
*Panel is located under cabinet with Filler Board
Locate the studs with a stud finder and mark where
the cabinets are to be installed. Remove all the doors
and drawers from the cabinets before installation.
Measure the area to confirm that the kitchen design
used will work.
Remove door and drawer from square corner
cabinet. On the square corner opening side
of the face frame (opening without door
attached), a line 1/2” from the edge of the
opening needs to be marked onto the face
frame. This will locate the blind panel for
attachment.
NOTE: Door can be placed on either side of
the cabinet depending on design needs.
DOOR LOCATION
FACE FRAME
1/2
1/2
1/2
1/2
(6.18.13) SCB INSTRUCTIONS A5131
STEP 5
STEP 6
STEP 7
Attach the blind panel to the face frame
using the recommended (8) #6 x 1/2" flat
head screws. These screws must be
purchased separately. Reattach the door
and drawer front to the cabinet.
Place the predrilled blind panel onto the
face frame using the markings placed on
the face frame in the last step. Mark the
predrilled hole locations from the blind
panel onto the face frame. Remove the
blind panel and predrill the face frame (8)
places with a 7/64" diameter drill bit, 1/2"
deep.
Position the Square Corner Base cabinet
with reference to the specifications on
page one. Do not secure to the wall yet.
SQUARE CORNER
CABINET
ADJACENT
CABINET
Z
Y
X
Filler Board
Wall
=Open Space
MARK
(8) HOLE
LOCATIONS
ONTO THE
FACE FRAME.
Attach panel to the face frame
using the (8) #6 x 1/2"
flat head screws.
10/15/2023 A5168-ESP-Rev 1
Piezas incluidas:
• Gabinete de esquina cuadrado
• Relleno - (Se envía en la parte inferior del gabinete)
• Panel ciego - (Se envía en la parte inferior del gabinete)
Materiales necesitados:
• Tornillos de cabeza plana #6 x ½”
• Tornillos para madera de cabeza plana o moldurada de 2 ½”
• Tornillos con cabeza de arandela redonda de 2 ½”
(6.18.13) SCB INSTRUCTIONS A5131
Instructions for Square Corner Cabinet Installation
Parts Included:
(1) Blind Panel
(1) Square Corner Cabinet
(1) Filler Board
Tools Needed:
Phillips Head Screwdriver, Tape Measure,
Marking Tool, Drill with 7/64” Bit and 3/32”
Bit, Saw
Square Corner Cabinet Information:
STEP 1
Parts Needed:
(8) #6 x 1/2” Flat Head Screws
(2) #10 X 2 1/2” Washer Head Screws
(2) # 8 Flat Head Screws of Appropriate length
KEY
X: Minimum pull for
Square Corner Cabinet
Y: Maximum pull for
Square Corner Cabinet
Z: Minimum filler size
required between
cabinets
Min. pull is defined
when square corner or
adjacent cabinet doors
can be opened 90 deg.
and/or drawers can be
fully extended without
hitting adjacent cabinet
door/drawer when shut.
SQUARE CORNER
CABINET
ADJACENT
CABINET
Z
Y
X
Filler Board
Wall
=Open Space
Y
Min. Pull
Min. Pull w/Hardware
Max. Pull
Min. Filler Required Min. Filler Required w/Hardware
1 1/4" Overlay
3/4" 2 1/4" 12 1/2" 1" 2 1/2"
7/16" Overlay
1/4" 1 3/4" 12 1/2" 1/2" 2"
X
Z
NOTE: To determine your cabinet’s over-
lay, measure the distance from the
drawer or door to the edge of the face
frame and reference the drawing above.
Remove baseboard and other objects on the wall
area where the cabinets are to be installed. Using a
straight edge and a level, find the high point in the
floor where the cabinets are to be installed. From the
high point, mark a level horizontal line on each wall
where the cabinets will be attached. From the level
lines mark another parallel level horizontal line 35" up
for base cabinets, 54" for wall cabinets and 84", 90"
or 96", depending upon your tall cabinet heights. The
top of the base and tall cabinets and the bottom of
the wall cabinets will be located at these marks.
ATTN: FILLER BOARD AND COVER PANEL ARE STAPLED
UNDERNEATH YOUR SQUARE CORNER BASE CABINET.
Cubrir
Mín. Jalar Máx. JalarMín. Tirar con hardware Mín. Relleno requerido Mín. Requiere relleno con hardware
Cubrir
1/4 DESDE EL BORDE
(8) LUGARES
CENTRO
CENTRO
UBICACIÓN DE
LA PUERTA
MARCO DE
LA CARA
MARQUE (8)
UBICACIONES DE
ORIFICIOS EN EL
MARCO FRONTAL