
Installation Guide
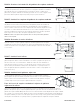


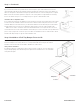
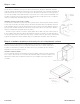


Table Of Contents

SYSTEM 9
ADJUSTMENT
INSTRUCTIONS
TO ADJUST DOOR HEIGHT
Shipping pins must be removed before atempting
height adjustment. You will need to use pliers.
Rotate the doors to the right, exposing the height
adjustment screw.
TO ADJUST DOOR CLOSING ALIGNMENT
Open the doors so that one side of the bottom
mounting bracket can be seen.
Remove the shipping screw and loosen the star-
washer screw. If the door is out of alignment to
the left insert shipping screw into the right side of
the slot as shown. Reverse if alignment is out to
the right. Repeat on both sides of bottom mount-
ing bracket.
Rotate bracket to the left or right depending which
way the doors should go.
Turn the screw to the right to raise the doors and
turn to left to lower the doors.
*Trays do not need to be unloaded to adjust (up to 100 lbs.)
Tighten the door alignment screws and close the
door to check alignment. Repeat if necessary.
TO ADJUST FOR SIDE/SIDE CLEARANCE
Remove shipping screws. Loosen the front and
back (star-washer) screws.
Adjust mounting bracket to correct the gap between
the sides of the door and frame at the top.
TOP ADJUSTEMENT
Tighten, check and repeat if necessary..Re-insert
shipping screw in any unused hole or slot.
Remove shipping screws. If you have not already
done so. Loosen (star-washer) screws.
Adjust mounting bracket to correct the gap
between the sides of the door and frame at the
bottom.
BOTTOM ADJUSTMENT
Tighten, check and repeat if necessary.
REMOVAL of the Lazy Daisy® Susan Unit
In the unlikely event that the entire Lazy Daisy
Susan. Unit must be removed, please follow
these instructions.
1. Detach doors from both the top and bottom
trays.
2. Remove the shipping pins from above
the top tray.
3. Lift bottom tray and remove bottom tray
securing pin.
4. Lift top tray and remove top tray securing pin.
5. Remove screws from top mounting bracket.
6. Lift both trays to the middle of the cabinet. Tilt
the tube and remove top mounting bracket.
7. Tilt bottom of the tube and remove brake pivot
post.
8. Rotate trays so that complete unit can be
removed from cabinet.
9. Remove trays from tube.
10. Remove bottom mounting bracket.
SYSTEM 9 PIE-CUT PARTS DRAWING
________________________________________
_____________________________________
________________________________________
CARE INSTRUCTIONS: Wipe clean with soft cloth and mild, non-abrasive detergent or soap solution. Avoid scoring pads, etc.
1.
2.
3.
1.
2.
3.
4.
1.
2.
1.
2.
3.
3.
I-LD-3002
BY
SYSTÈME 9
AJUSTEMENT
INSTRUCTIONS
POUR RÉGLER LA HAUTEUR DE LA PORTE
POUR AJUSTER L’ALIGNEMENT DE
FERMETURE DE LA PORTE
POUR RÉGLER LE JEU LATÉRAL/LATÉRAL RETRAIT de l’unité Lazy Daisy
®
Susan
1. Les goupilles d’expédition doivent être retirées avant de tenter
le réglage de la hauteur. Vous devrez utiliser des pinces.
1. Ouvrez les portes de manière à ce qu’un côté du support de
montage inférieur soit visible.
2. Retirez la vis d’expédition et desserrez la vis à rondelle étoilée.
Si la porte n’est pas alignée avec la gauche, insérez la vis
d’expédition dans le côté droit de la fente, comme illustré.
Inversez si l’alignement est à droite. Répétez l’opération des
deux côtés du support de montage inférieur.
RÉGLAGE SUPÉRIEUR
1. Retirez les vis d’expédition. Desserrez les vis avant et arrière
(rondelle en étoile).
2. Ajustez le support de montage pour corriger l’écart entre les
côtés de la porte et le cadre en haut.
3. Serrez, vérifiez et répétez si nécessaire. Réinsérez la vis
d’expédition dans tout trou ou fente inutilisé.
RÉGLAGE DU BAS
1. Retirez les vis d’expédition si ce n’est pas déjà fait. Desserrez
les vis (rondelles en étoile).
Dans le cas peu probable où l’ensemble de l’unité Lazy Daisy
Susan doit être retiré, veuillez suivre ces instructions:
1. Détachez les portes des plateaux supérieur et inférieur.
2. Retirez les broches d’expédition situées au-dessus du plateau
supérieur.
3. Soulevez le plateau inférieur et retirez la goupille de fixation
du plateau inférieur.
4. Soulevez le plateau supérieur et retirez la goupille de fixation
du plateau supérieur.
5. Retirez les vis du support de montage supérieur.
6. Soulevez les deux plateaux jusqu’au milieu de l’armoire.
Inclinez le tube et retirez le support de montage supérieur.
7. Inclinez le bas du tube et retirez le pivot de frein.
8. Faites pivoter les plateaux afin que l’unité complète puisse
être retirée de l’armoire.
9. Retirez les plateaux du tube.
10. Retirez le support de montage inférieur.
DESSIN DES PIÈCES DÉCOUPÉES EN TARTE DU
SYSTÈME 9
3. Faites pivoter le support vers la gauche ou la droite selon la
direction dans laquelle les portes doivent aller.
4. Serrez les vis d’alignement de la porte et fermez la porte pour
vérifier l’alignement. Répétez si nécessaire.
2. Faites pivoter les portes vers la droite, exposant la vis de
réglage de la hauteur.
3. Tournez la vis vers la droite pour relever les portes et tournez
vers la gauche pour abaisser les portes.
*Les plateaux n’ont pas besoin d’être déchargés pour s’ajuster (jusqu’à 100 lb).
INCORRECTE
DES ÉCARTS
INÉGAUX
INCORRECTE
DES ÉCARTS
INÉGAUX
INCORRECTE
CORRECTE
ÉCARTS ÉGAUX
CORRECTE
ÉCARTS ÉGAUX
CORRECTE
POSITION CENTRÉE
INSTRUCTIONS D’ENTRETIEN : Essuyer avec un chiffon doux et un détergent doux et non abrasif ou une solution savonneuse.
Évitez les blocs de notation, etc.
2. Ajustez le support de montage pour corriger l’écart entre les
côtés de la porte et le cadre en bas.
3. Serrez, vérifiez et répétez si nécessaire.
I-LD-FRE-3002
Fente d’alignement de la porte
Vis d’expédition
Vis à rondelle étoile
Fente de
réglage
latérale
Support de montage
supérieur
Plateau supérieur
Vis de réglage de
la hauteur
Goupille de
xation du plateau
supérieur
Goupille de
xation du plateau
inférieur
Plateau inférieur
Poteau de pivot
de frein
Support de
montage inférieur
Épinglettes d’expédition
Tube en acier
Vis d’expédition
Vis à rondelle
étoile