
Installation Guide
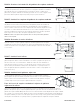


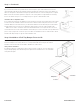
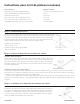
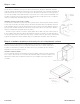


Table Of Contents

SYSTEM 9
ADJUSTMENT
INSTRUCTIONS
TO ADJUST DOOR HEIGHT
Shipping pins must be removed before atempting
height adjustment. You will need to use pliers.
Rotate the doors to the right, exposing the height
adjustment screw.
TO ADJUST DOOR CLOSING ALIGNMENT
Open the doors so that one side of the bottom
mounting bracket can be seen.
Remove the shipping screw and loosen the star-
washer screw. If the door is out of alignment to
the left insert shipping screw into the right side of
the slot as shown. Reverse if alignment is out to
the right. Repeat on both sides of bottom mount-
ing bracket.
Rotate bracket to the left or right depending which
way the doors should go.
Turn the screw to the right to raise the doors and
turn to left to lower the doors.
*Trays do not need to be unloaded to adjust (up to 100 lbs.)
Tighten the door alignment screws and close the
door to check alignment. Repeat if necessary.
TO ADJUST FOR SIDE/SIDE CLEARANCE
Remove shipping screws. Loosen the front and
back (star-washer) screws.
Adjust mounting bracket to correct the gap between
the sides of the door and frame at the top.
TOP ADJUSTEMENT
Tighten, check and repeat if necessary..Re-insert
shipping screw in any unused hole or slot.
Remove shipping screws. If you have not already
done so. Loosen (star-washer) screws.
Adjust mounting bracket to correct the gap
between the sides of the door and frame at the
bottom.
BOTTOM ADJUSTMENT
Tighten, check and repeat if necessary.
REMOVAL of the Lazy Daisy® Susan Unit
In the unlikely event that the entire Lazy Daisy
Susan. Unit must be removed, please follow
these instructions.
1. Detach doors from both the top and bottom
trays.
2. Remove the shipping pins from above
the top tray.
3. Lift bottom tray and remove bottom tray
securing pin.
4. Lift top tray and remove top tray securing pin.
5. Remove screws from top mounting bracket.
6. Lift both trays to the middle of the cabinet. Tilt
the tube and remove top mounting bracket.
7. Tilt bottom of the tube and remove brake pivot
post.
8. Rotate trays so that complete unit can be
removed from cabinet.
9. Remove trays from tube.
10. Remove bottom mounting bracket.
SYSTEM 9 PIE-CUT PARTS DRAWING
________________________________________
_____________________________________
________________________________________
CARE INSTRUCTIONS: Wipe clean with soft cloth and mild, non-abrasive detergent or soap solution. Avoid scoring pads, etc.
1.
2.
3.
1.
2.
3.
4.
1.
2.
1.
2.
3.
3.
I-LD-3002
BY
SISTEMA 9
AJUSTAMIENTO
INSTRUCCIONES
PARA AJUSTAR LA ALTURA DE LA PUERTA
PARA AJUSTAR LA ALINEACIÓN
DE CIERRE DE LA PUERTA
PARA AJUSTAR EL ESPACIO
LATERAL/LATERAL
EXTRACCIÓN de la unidad Lazy Daisy® Susan
1. Se deben quitar los pasadores de envío antes de intentar
ajustar la altura. Necesitará utilizar unos alicates.
1. Abra las puertas para que se pueda ver un lado del soporte de
montaje inferior.
2. Retire el tornillo de envío y afloje el tornillo de la arandela de
estrella. Si la puerta no está alineada con la izquierda, inserte
el tornillo de envío en el lado derecho de la ranura como se
muestra. Invierta si la alineación está hacia la derecha. Repita
en ambos lados del soporte de montaje inferior.
AJUSTE SUPERIOR
1. Retire los tornillos de envío. Afloje los tornillos delanteros y
traseros (arandelas de estrella).
2. Ajuste el soporte de montaje para corregir el espacio entre los
lados de la puerta y el marco en la parte superior.
3. Apretar, comprobar y repetir si es necesario. Vuelva a insertar el
tornillo de envío en cualquier orificio o ranura no utilizado.
AJUSTE INFERIOR
1. Retire los tornillos de envío si aún no lo ha hecho. Afloje los
tornillos (arandela de estrella).
En el improbable caso de que sea necesario retirar toda la unidad
Lazy Daisy Susan, siga estas instrucciones:
1. Separe las puertas de las bandejas superior e inferior.
2. Retire las clavijas de envío que se encuentran encima de la
bandeja superior.
3. Levante la bandeja inferior y retire el pasador de fijación de la
bandeja inferior.
4. Levante la bandeja superior y retire el pasador de fijación de
la bandeja superior.
5. Retire los tornillos del soporte de montaje superior.
6. Levante ambas bandejas hasta la mitad del gabinete. Incline
el tubo y retire el soporte de montaje superior.
7. Incline la parte inferior del tubo y retire el poste de pivote del freno.
8. Gire las bandejas para poder retirar la unidad completa del gabinete.
9. Retire las bandejas del tubo.
10. Retire el soporte de montaje inferior.
DIBUJO DE PIEZAS CORTADAS EN TARTA DEL
SISTEMA 9
3. Gire el soporte hacia la izquierda o hacia la derecha
dependiendo de en qué dirección deben ir las puertas.
4. Apriete los tornillos de alineación de la puerta y ciérrela para
verificar la alineación. Repita si es necesario.
2. Gire las puertas hacia la derecha, exponiendo el tornillo de
ajuste de altura.
3. Gire el tornillo hacia la derecha para subir las puertas y gírelo
hacia la izquierda para bajarlas.
*No es necesario descargar las bandejas para ajustarlas (hasta 100 lbs.)
INCORRECTA
BRECHAS DESIGUAL
INCORRECTA
BRECHAS DESIGUAL
INCORRECTA
Ranura de alineación de la puerta
CORRECTA
BRECHAS IGUALES
CORRECTA
BRECHAS IGUALES
CORRECTA
POSICIÓN CENTRADA
INSTRUCCIONES DE CUIDADO: Limpie con un paño suave y un detergente o solución jabonosa suave y no abrasivo.
Evite las almohadillas rayadoras, etc.
2. Ajuste el soporte de montaje para corregir el espacio entre los
lados de la puerta y el marco en la parte inferior.
3. Apretar, comprobar y repetir si es necesario.
I-LD-ESP-3002
Tornillo de envío
Tornillo arandela estrella
Ranura de
ajuste de lado
a lado
Soporte de montaje
superior
Bandeja superior
Pines de envío
Bandeja inferior
Tornillo de ajuste
de altura
Poste de pivote
de freno
Soporte de
montaje inferior
Pasador de
jación de la
bandeja superior
Pasador de
jación de la
bandeja inferior
Tubo de acero
Tornillo de envío
Tornillo arandela
estrella