
Installation Guide
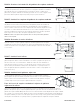


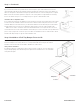
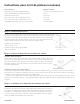
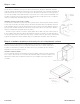


Table Of Contents

Instructions for Roll Tray Kit
Step 1: Pre Drill Face Frame
Remove the doors from the cabinet. Measure up from the top of the bottom cross rail of the cabinet
face frame to the dimensions below. Make a mark on inside of the end rail at that location. At that
mark measure from the outside of the face frame back 3/8” and mark. Where the two marks intersect,
predrill a ½” deep by 1/8” diameter hole. Repeat step on opposite side of face frame opening.
Installation to Bottom of Cabinet:
- Measure up 1 1/8”
Installation Above Adjustable Shelf:
- Measure up 13”
Step 2: Prepare Cabinet Member Slide
Installation to Bottom of Cabinet:
If your cabinet has pre-drilled holes in the back panel, install the cabinet members with back
sockets into the pre-drilled holes. If your cabinet does NOT have pre-drilled holes in the back
panel, remove the back socket from the cabinet members. Attach cabinet member slide to
mounting block with a 5/8” screw. Proceed to Step 3 for further instruction.
Installation Above Adjustable Shelf:
If your cabinet has pre-drilled holes in the back panel, install the cabinet members with back sockets into the pre-drilled holes. If your cabinet
does NOT have pre-drilled holes in the back panel, keep back sockets installed on cabinet members Proceed to Step 3 for further instruction.
Make sure the slide is oriented as shown in the detail to the right. Snap 1/8” thick roll tray spacer onto cabinet member – as also shown
in detail to the right. Repeat step for opposite cabinet member slide.
Step 3: Installation of Cabinet Member Slide
Installation to Bottom of Cabinet:
Make sure the slide is oriented as shown in the detail to the right and that the screw is placed in the
hole shown. Attach the front of the cabinet member slide and snap-on spacer to the face frame in
the pre-drilled hole (refer to step 1) using a 5/8” screw. The spacer should be located between the
face frame and the cabinet member slide. Repeat step for opposite cabinet member slide.
Parts Included:
(1) Roll Tray with Slides Attached
(1) Pair of Cabinet Member Slides
(2) 1/8” Snap-on Spacers
(4) 5/8" Trim Head or Flat Head Wood Screws
(2) 2-1/2" Trim Head or Flat Head Wood Screws
(1) RTBP Kit (Includes bumpers & 5/8" screws)
Tools Needed:
• Phillips Head Screwdriver Tape Measure
• Drill
• 3/32” Drill Bit
• 1/8” Drill Bit
• 5/16” Drill Bit
• Marking Tool
(11/29/19) A5019 R20
Instructions for Roll Tray Kit
RT18-RT24
Parts Included:
(1) Roll Tray with Slides Attached
(1) Pair of Cabinet Member Slides
(2) Mounting Blocks
(2) 1/8” Snap-on Spacers
(4) #6 x 5/8” Wood Screws
(2) #10 x 2 1/2” Wood Screws
(1) RTBP Kit (Includes bumpers & #6 screws)
STEP 1
Pre-Drill Face Frame
Remove the doors from the cabinet. Measure up from
the top of the bottom cross rail of the cabinet face
frame to the dimensions below. Make a mark on
inside of the end rail at that location. At that mark
measure from the outside of the face frame back 3/8”
and mark. Where the two marks intersect, predrill a ½”
deep by 1/8” diameter hole. Repeat step on opposite
side of face frame opening.
Installation to Bottom of Cabinet:
- Measure up 1 1/8”
Installation Above Adjustable Shelf:
- Measure up 13”
Installation of Cabinet Member Slide
Installation to Bottom of Cabinet:
Make sure the slide is oriented as shown in the detail to the
right and that the screw is placed in the hole shown. Attach
the front of the cabinet member slide and snap-on spacer to
the face frame in the pre-drilled hole (refer to step 1) using a
#6 x 5/8” screw. The spacer should be located between the
face frame and the cabinet member slide. Repeat step for
opposite cabinet member slide.
STEP 3
STEP 2
Tools Needed:
Phillips Head Screwdriver
Tape Measure
Drill
3/32” Drill Bit
1/8” Drill Bit
5/16” Drill Bit
Marking Tool
Prepare Cabinet Member Slide
Installation to Bottom of Cabinet:
If your cabinet has pre-drilled holes in the back panel, install the cabinet
members with back sockets into the pre-drilled holes.
If your cabinet does NOT have pre-drilled holes in the back panel, remove the
back socket from the cabinet members. Attach cabinet member slide to
mounting block with a #6 x 5/8” screw. Proceed to Step 3 for further
instruction.
Installation Above Adjustable Shelf:
If your cabinet has pre-drilled holes in the
back panel, install the cabinet members
with back sockets into the pre-drilled holes.
If your cabinet does NOT have pre-drilled
holes in the back panel, keep back sockets
installed on cabinet members and.
Proceed to Step 3 for further instruction.
Make sure the slide is oriented as shown in the detail to the right. Snap 1/8”
thick roll tray spacer onto cabinet member – as also shown in detail to the
right. Repeat step for opposite cabinet member slide.
13"
10/15/2023 A5176-ENG-Rev 1