
Installation Guide
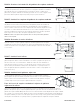


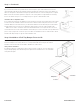
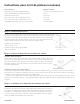
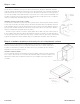


Table Of Contents

Step 3 - Continued:
If your cabinet does NOT have pre-drilled holes in the back panel, press and hold the back end of the
cabinet member slide with the mounting block attached against the end panel. Using a 3/32” drill bit, pre-
drill a hole through the cabinet bottom using the pre-drilled vertical hole on the mounting block as a guide.
Make sure the block remains against the end panel or the roll tray will be too tight. Attach the mounting
block to the bottom using a 2 ½” screw. Repeat step for opposite cabinet member slide.
Installation Above Adjustable Shelf:
If your cabinet does NOT have pre-drilled holes in the back panel, measure up from the bottom of the cabinet
12 1/8” and 13 3/8” and make a mark on the back of the cabinet. From the end panel, measure in 1 3/16”
and mark. Where the two marks intersect, pre-drill a 5/16” diameter hole thru the back panel. Install cabinet
member with the back socket in the pre-drilled holes. Repeat step for opposite cabinet member slide.
Make sure the slide is oriented as shown in the detail and that the screw is placed in the correct hole
shown. Attach the front of the cabinet member slide and the spacer to the face frame in the pre-drilled hole
(refer to step 1) using a 5/8” screw. The spacer should be located between the face frame and the cabinet
member slide. Repeat step for opposite cabinet member slide.
Step 4: Installation of Roll Tray Bumper Protector Kit
Place the bumper directly on top of the roll tray guide and along the edge of the roll tray front.
Fasten the bumper to the roll tray with the ½” screw provided. Slide the roll tray into the cabinet
members located on the slide rail assemblies. Reattach the cabinet doors.
Utility Cabinet Installation:
If installing roll trays into a utility cabinet, please reference Steps 1-4 above. Once the desired roll
tray mounting height(s) is/are determined, please adjust referenced dimensions to accommodate
newly desired heights.
countertop
supports
STEP 3
cont.
Installation of Roll Tray Bumper Protector Kit
Place the bumper directly on top of the roll tray guide and
along the edge of the roll tray front. Fasten the bumper to
the roll tray with the #6 x ½” screw provided.
Slide the roll tray into the cabinet members located on
the slide rail assemblies. Reattach the cabinet doors.
Utility Cabinet Installation
If installing roll trays into a utility cabinet, please
reference Steps 1-4 above. Once the desired roll tray
mounting height(s) is/are determined, please adjust
referenced dimensions to accommodate newly desired
heights.
STEP 4
Install Roll Tray
If your cabinet does NOT have pre-drilled holes in the back
panel, press and hold the back end of the cabinet member slide
with the mounting block attached against the end panel. Using a
3/32” drill bit, pre-drill a hole through the cabinet bottom using the
pre-drilled vertical hole on the mounting block as a guide. Make
sure the block remains against the end panel or the roll tray will
be too tight. Attach the mounting block to the bottom using a #10
x 2 ½” screw. Repeat step for opposite cabinet member slide.
Installation Above Adjustable Shelf:
If your cabinet does NOT have pre-drilled holes in the back
panel, measure up from the bottom of the cabinet 12 1/8” and 13
3/8” and make a mark on the back of the cabinet. From the end
panel, measure in 1 3/16” and mark. Where the two marks
intersect, pre-drill a 5/16” diameter hole thru the back panel.
Install cabinet member with the back socket in the pre-drilled
holes. Repeat step for opposite cabinet member slide.
Make sure the slide is oriented as shown in the detail and that the
screw is placed in the correct hole shown. Attach the front of the
cabinet member slide and the spacer to the face frame in the pre-
drilled hole (refer to step 1) using a #6 x 5/8” screw. The spacer
should be located between the face frame and the cabinet
member slide. Repeat step for opposite cabinet member slide.
(11/29/19) A5019 R20
13 3/8"
12 1/8"
1 3/16"
10/15/2023 A5176-ENG-Rev 1