Item #1000 000 000 Model #FG-VOL3DN USE AND CARE GUIDE AINSWORTH 3 PIECE BISTRO SET Questions, problems, missing parts? Before returning to the store, call Hampton Bay Customer Service 8 a.m. – 7 p.m., EST, Monday – Friday, 9 a.m. – 6 p.m., EST, Saturday 1-855-HD-HAMPTON HAMPTONBAY.COM THANK YOU We appreciate the trust and confidence you have placed in Hampton Bay through the purchase of this bistro set. We strive to continually create quality products designed to enhance your home.
Table of Contents Table of Contents .......................................................... 2 Safety Information ......................................................... 2 Warranty ......................................................................... 3 What is Covered ......................................................... 3 What is Not Covered .................................................. 3 Pre-Assembly ................................................................ 4 Planning Assembly ....
Warranty 3 YEAR LIMITED WARRANTY WHAT IS COVERED Residential use of this furniture is warranted for a three (3) year limited warranty period for the frame construction. The warranty is valid from the date of purchase and applies only to the original purchaser.
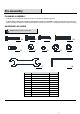
Pre-Assembly PLANNING ASSEMBLY It will take one or two people about 20 minutes to complete the assembly process. PLEASE READ COMPLETE INSTRUCTION MANUAL PRIOR TO ASSEMBLY! Identify all parts packed in the carton against the parts list. Remove all protective materials and place the parts on a nonabrasive surface to avoid scratching. HARDWARE INCLUDED NOTE: Hardware shown to actual size. AA BB EE FF CC DD GG HH JJ Part Description KK Quantity AA BB Bolt (1/4 in. x 30 mm) Bolt (5/16 in.
Pre-Assembly (continued) TABLE PACKAGE CONTENTS A B C D Part A B C D Description Quantity Table Top Table Leg Leg Connector Ring Umbrella Hole Cap 5 1 4 1 1 HAMPTONBAY.COM Please contact 1-855-HD-HAMPTON for further assistance.
Pre- Assembly (continued) CHAIR PACKAGE CONTENTS E H F I G Part Description Quantity E Chair Back 2 F G H I Chair Leg (Left) Chair Leg (Right) Chair Seat Seat Cushion 2 2 2 2 6
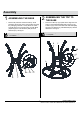
Assembly 1 □ 2 ASSEMBLING THE BASE Remove all protective material carefully. Avoid scratching the surface of the frames while removing the packaging material. Loosely attach the Table Legs (B) to the Leg Connector Ring (C) with Bolts (AA) through the Lock Washers (GG) and Flat Washers (FF). See figure. □ ASSEMBLING THE TOP TO THE BASE Place the Table Top (A) up-side down. Align the bolt holes on the assembled table base to those on the Table Top (A).
Assembly (continued) 3 ADJUSTING THE TABLE & FINISHING ASSEMBLY □ □ □ With the help of another person, carefully turn the table to up-right position. Check the alignment of the table and adjust if necessary. Once the alignments are correct and all bolts are in place, tighten all bolts with Hex Screwdriver (HH) and Hex Wrench (GG). D A Place the Umbrella Hole Cap (D) on the umbrella hole in the center of the table. The table is ready for your enjoyment now.
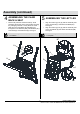
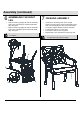
Assembly (continued) 4 □ 5 ASSEMBLING THE LEFT LEG ASSEMBLING THE CHAIR BACK & SEAT Remove all protective material carefully. Avoid scratching the surface of the frames while removing the packaging material. Loosely attach the Chair Seat (H) to the Chair Back (E) with Bolts (CC) through the Lock Washers (GG), Flat Washers (FF), Chair Seat (H) and Chair Back (E). See figure. □ □ NOTE: Do not tighten bolts completely until assembly is completed.
Assembly (continued) 6 □ □ 7 FINISHING ASSEMBLY ASSEMBLING THE RIGHT LEG Align the Chair Leg (Right) (G) with the assembly hole on the Chair Seat (H) and attach with Bolts (EE). See figure. Align the Chair Leg (Right) (G) with the assembly hole on the Chair Back (E) and attach with Bolts (DD). See figure. □ □ □ □ NOTE: Do not tighten bolts completely until assembly is completed. Carefully turn the Dining Chair to the up-right position on a flat surface. Check the alignment of the chair.
Care and Cleaning Clean the furniture frame with a wet towel using mild soap and water solution. Dry completely with a soft towel. Clean cushions and sling seat material with a mild solution of soap and water and hang cushions to drip dry completely. It is recommended that cushions be stored in a dry area during rain and if they are not in use and in direct sunlight. Do not machine wash or dry. Do not use bleach or strong solvents to clean any of your patio furniture.
Questions, problems, missing parts? Before returning to the store, call Hampton Bay Customer Service 8 a.m. – 7 p.m., EST, Monday – Friday, 9 a.m. – 6 p.m., EST, Saturday 1-855-HD-HAMPTON HAMPTONBAY.COM Retain this manual for future use.