
Instructions / Assembly


1
2
3
4
5
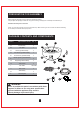
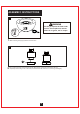
"44&.#-:*/4536$5*0/4
8"3/*/(
.HHSfire glass DQGRWKHUREMHFWV
RIIRIVFUHHQVKRZQDWOHIW
+ROHVLQWKHVFUHHQPXVWEH
H[SRVHGLQRUGHUWRDOORZJDVWR
HVFDSH
%ORFNHGVFUHHQFDQFDXVHJDVWR
EXLOGLQVLGH)LUHpitDQG
XOWLPDWHO\FDXVHDQH[SORVLRQ
DQGULVNRIVHULRXVLQMXU\
$033&$5
#VSOFSSJOHJTDPNQMFUFMZ
DPWFSFEFYDFQUGPSTDSFFO
*/$033&$5
/PUFUIBUUIFCVSOFSSJOH
JTWJTJCMF
6b
4DSFFO
D
6c
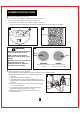
D Place fire glass(I) evenly in fire bowl.
Use caution when handling fire glass as it is sharp. 6HH)LJXUHD
b) Do not place any fire glassover the screen.6HHILJXUHE
F Completely cover the entire burner ring with fire glass.6HHILJXUHF
Failure to completely cover the burner ring with the fire glasswill cause flame to extinguish occasionally.
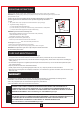
Before using fire pit, check for gas leaks.
Perform leak test in a well-ventilated area outside and where no source of spark can occur.
a) After opening door for access, open tank valve fully (counter-
clockwise).
b) Turn control knob to the OFF position.
c) Apply soapy water solution (3 drops dish detergent plus 4 oz.
water) to check all connections for leaks before attempting to light
Fire Table.
d) Coat soapy water onto all connections (shown in figure at right,
1, 2 ,3, 4, 5). 6HH)LJXUH
e) 7XUQFRQWURONQREWRWKH21SRVLWLRQ,IWKHUHDUHDQ\OHDNV
VRDS\ZDWHUZLOOEXEEOHZKHUHOHDNLVRFFXUULQJ
If a leak is found, turn tank valve off and do not use fire pit
until repairs are made.
I
#VSOFS
3JOH
4DSFFO