Item #1002 665 203 Model #FSC17008 Improved Version USE AND CARE GUIDE 11 FT. X 11 FT. GAZEBO Questions, problems, missing parts? Before returning to the store, call Hampton Bay Customer Service 8 a.m. - 7 p.m., EST, Monday – Friday, 9 a.m. – 6 p.m., EST, Saturday 1-855-HD-HAMPTON HAMPTONBAY.COM THANK YOU quality products designed to enhance your home. Visit us online to see our full line of products available for your home improvement needs.
Table of Contents Table of Contents . . . . . . . . . . . . . . . . . . . . . . . . . . . . . . . . . . . 2 Safety Information . . . . . . . . . . . . . . . . . . . . . . . . . . . . . . . . . . 2 Warranty . . . . . . . . . . . . . . . . . . . . . . . . . . . . . . . . . . . . . . . . . . 2 Pre-Assembly . . . . . . . . . . . . . . . . . . . . . . . . . . . . . . . . . . . . . . 3 Planning Assembly. . . . . . . . . . . . . . . . . . . . . . . . . . . . . . . . . 3 Hardware Included. . . . . . . . . . . . . .
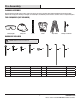
Pre-Assembly PLANNING ASSEMBLY Before beginning assembly of this product, make sure all parts are present. Compare parts with the Hardware Included and Package Contents lists. If any part is missing or damaged, do not attempt to assemble the product. Contact customer service for replacement parts. TOOLS REQUIRED (NOT INCLUDED) Safety Goggles Safety Hat Level Gloves Step Ladder Phillips Screwdriver HARDWARE INCLUDED NOTE: Hardware not shown to actual size.
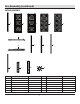
Pre-Assembly (continued) PACKAGE CONTENTS A C B E D F L K Part Description I H G J N M Quantity Part A Post 4 H Lower slide rail 4 B Wall screen 4 I Lower slide rail 4 C Wall screen 4 J Upper rail track 4 D Sliding door 4 K Upper rail track 4 E Sliding door 4 L Inner connector 4 F Support bar 4 M Lower track connector 4 G Support bar 4 N Top center connector 1 4 Description Quantity
Pre-Assembly (continued) PACKAGE CONTENTS (CONTINUED) O S Description V U T W Part R Q P Y X Quantity Part Description Quantity U Door bolt 8 O Upper corner bar 4 P Lower corner bar 4 V Track wheel 16 Q Middle bar 4 W Large canopy 1 8 X Small canopy 1 Y Screen connector 8 R S Corner connector 4 T Door knob 8 5 HAMPTONBAY.COM Please contact 1-855-HD-HAMPTON for further assistance.
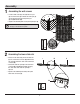
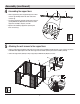
Assembly 1 Assembling the wall screens □ Position a wall screen (B) to the right side of a post (A) and a wall screen (C) to the left side of the post (A). Secure the wall screens (C and B) to the post (A) using M6x35 bolts (AA). C A A B AA □ Repeat for the remaining wall screens (B and C) and posts (A). NOTE: Ensure the horizontal supports on the screens (B and C) go on the outside of the gazebo.
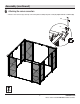
Assembly (continued) 3 Attaching the lower slide rails □ Position the lower slide rail assemblies (H and I) along the bottom perimeter of the gazebo assembly. □ Position two nuts (EE) into each left lower slide rail (H) and right lower slide rail (I), as shown.
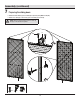
Assembly (continued) 4 Assembling the support bars L F G □ Slide a support bar (F) and a support bar (G) onto an inner connector (L) until they meet in the center of the inner connector (L). □ Secure the support bars (F and G) onto the inner connector (L) using M6x15 bolts (BB). Ensure the center hole of the support bar assembly is exposed, as shown. □ Repeat for the remaining support bars (F and G) and inner connectors (L).
Assembly (continued) 6 Attaching the corner connectors □ Attach a corner connector (S) to each top corner of the gazebo assembly using two screws (CC). Tighten with the screwdriver (GG). GG CC S CC x4 x8 9 HAMPTONBAY.COM Please contact 1-855-HD-HAMPTON for further assistance.
Assembly (continued) 7 Preparing the sliding doors □ Attach two track wheels (V) to each sliding door (D and E) using M6x15 bolts (BB). □ Attach a door bolt (U) to a door knob (T) on each sliding door (D and E). NOTE: Ensure the horizontal supports on the screens (B and C) go on the outside of the gazebo.
Assembly (continued) 8 Attaching the upper rail tracks to the doors x4 □ Slide a upper rail track (J) onto the top of a sliding door (D) and a right upper rail track (K) onto the top of a sliding door (E). Ensure the upper rail tracks (J and K) slide smoothly over the rollers on the tops of the doors (D and E). J K D 9 Installing the sliding doors E E D BB 3 □ Position a set of sliding doors (D and E) into the bottom track of the gazebo assembly (see callout 1 and 2).
Assembly (continued) 10 Assembling the roof □ Connect a middle bar (Q) into every other connector on the top center connector (N) until the middle bars (Q) click into place. □ Connect an upper corner bar (O) into the remaining connectors on the top center connector (N) until the upper corner bars (O) click into place. □ Slide a lower corner bar (P) onto the ends of each upper corner bar (O) until the lower corner bars (P) click into place.
Assembly (continued) 11 Preparing the top cover □ Place the large canopy (W) and small canopy (X) over the roof. □ Slide the roof finishing bars (R) into each corner of the large canopy (W). X W R R W x8 R 13 HAMPTONBAY.COM Please contact 1-855-HD-HAMPTON for further assistance.
Assembly (continued) 12 Attaching the top cover assembly onto the gazebo □ Place the top cover assembly onto the gazebo. □ Attach the roof assembly to the center and corner sections of the gazebo using M6x15 bolts (BB).
Assembly (continued) 13 Completing the assembly □ Secure the large canopy (W) in place using M6x15 bolts (BB). □ Secure the gazebo to the ground using the ground stakes (GG). X W BB GG H I BB x4 x32 GG x16 Care and Cleaning □ Clean gently with a sponge using environmentally-friendly soap and water solution. Do not use abrasive materials, such as wire brushes, chemicals, cleansers or bleach. Do not use a pressure washer. Rinse well. Allow to air dry. 15 HAMPTONBAY.
Questions, problems, missing parts? Before returning to the store, call Hampton Bay Customer Service 8 a.m. – 7 p.m., EST, Monday – Friday, 9 a.m. – 6 p.m., EST, Saturday 1-855-HD-HAMPTON HAMPTONBAY.COM Retain this manual for future use.