
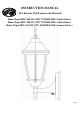
Instructions / Assembly

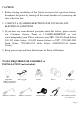


PARTS INCLUDED FOR INSTALLATION (parts are not to scale):
1ea Ground Screw (#11) 2ea Outlet Box Screws (#12) 2ea Mounting Screws (#13)
1ea Cross Bar (#14) 2ea Wire Connectors (#15) 2ea Lock Nuts (#18)
INSTALLATION INSTRUCTIONS:
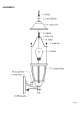
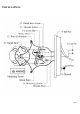
1. Screw the two Mounting Screws (#13) into the Cross Bar (#14). Mount the Cross Bar (#14)
to the Outlet Box (#16) using the two Outlet Box Screws (#12). [Make sure the threads of
the Mounting Screws (#13) are facing outside when the Cross Bar (#14) is attached to the
Outlet Box (#16).]
2. Wrap the ground wire from the fixture around the Ground Screw (#11) on the Cross Bar
(#14), and then connect the ground wire from the fixture to the ground wire from the
Outlet Box (#16). Connect the white wire from the fixture to the white wire (neutral wire)
from the Outlet Box (#16), and the black wire from the fixture to the black wire (live wire)
from the Outlet Box (#16). Cover the two wire connections using the two Wire Connectors
(#15). Wrap the two wire connections with electrical tape for a more secure connection.
Position the wires back inside the Outlet Box (#16). Note: If you have electrical questions,
consult your local electrical code for approved grounding methods.
3. Mount the body of the fixture on the wall by aligning the protruding Mounting Screws
(#13) all the way through the holes on the Wall Plate (#9). Be careful not to pinch any of
the wires between the fixture and the Outlet Box (#16). Tighten the fixture to the wall by
screwing the two Lock Nuts (#18) onto the two protruding Mounting Screws (#13).
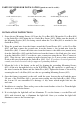
4. Once the fixture is mounted on the wall, caulk the space between the wall and the upper
3/4 area of the Wall Plate (#9) to prevent water seeping into the Outlet Box (#16). Leave
the bottom 1/4 area uncaulked for drainage of any water which might leak into the
enclosure.
5. Installation is complete. Turn on the power at the circuit breaker or fuse box. Turn the light
switch on to activate the fixture.
6. If it is daylight, the light bulb will not illuminate. To test the fixture, cover the Photocell
(#10) with electrical tape to illuminate the light bulb. Once you confirm the light bulb
illuminates, remove the electrical tape.
Page 6