
Instructions / Assembly


5 HAMPTONBAY.COM
Please contact 1-855-HD-HAMPTON for further assistance.
Assembly
□
□
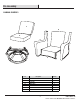
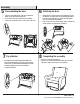
Place the chair right side up.
Insert the peg on the back (B) into the hole on the right arm (D).
Fasten with a bolt (AA) and washer (BB) and hand tighten. (Fig 1)
Check and make adjustments as needed.
Fully tighten all the bolts (AA) with the Hex wrench (DD) and
cover with the bolt caps (CC). (Fig 2)
1
□
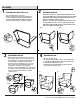
Place the right arm (D) on a soft surface.
Attach the seat (A) to the right arm (D) by aligning holes
on the seat (A) with the holes on the right arm (D) and
inserting bolts (AA) with washers (BB). Tighten half way
using the Hex wrench (DD). Do not tighten completely.
□
□
□
3
□
□
4
Attaching the right to the seat
Attaching the back
Attaching the left arm
Attaching the caps
Attach the back (B) to the right arm (D) by aligning the hole on
the back (B) with the hole on the right arm (D). Insert a bolt (AA)
with washer (BB) and tighten half way using the Hex wrench
(DD). Do not tighten completely. (Fig 1)
Attach the back (B) to the seat (A) by aligning two holes on the
back (B) with the two holes on the seat (A). Insert bolts (AA)
with washers (BB) and tighten half way using the Hex wrench
(DD). Do not tighten completely. (Fig 2)
2
Attach the left arm (C) by aligning two holes on the left
arm (C) with the two holes on the seat (A) and inserting
bolts (AA) with washers (BB). Tighten half way using the
Hex wrench (DD). Do not tighten completely. (Fig 1)
Insert the peg on the back (B) into the hole on the left
arm (C). Fasten with a bolt (AA) and washer (BB) and
hand tighten. Do not tighten completely. (Fig 2)
Align the hole on the back (B) with the hole on the left arm
(C) and attach using a bolt (AA) with washer (BB). Tighten
half way using the Hex wrench (DD). Do not tighten
completely. (Fig 3)
( Fig 1) ( Fig 2)
D D
A A
B
B
AA
BB
AA
BB
( Fig 1)
( Fig 2)
( Fig 3)
AA
BB
AA
BB
AA
BB
A
A
A
B
B
B
C
C
C
D
D
□
□
□
AA
AA
BB
BB
A
D
AA
BB
C
B
A
D
( Fig 1) ( Fig 2)
C
B
A
D
CC
CC
CC
CC