
Instructions / Assembly


5 HAMPTONBAY.com
Please contact 1-844-760-3644 for further assistance.
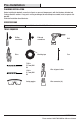
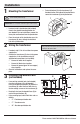
Installation
1
Mounting the transformer
WARNING: Turn off power at fuse or circuit breaker
before installing transformer (C).
IMPORTANT: Do not install the transformer (C) in an attic location.
Ƒ Locate or install a junction box (not included)
close to the selected mounting location for
your doorbell. For new installations, remove the
cover plate and knockout from the junction box.
Ƒ From the exterior of the junction box, pass the
transformer (C) wires through the knockout
hole in the junction box.
Ƒ Fasten the locknut (1) to the transformer’s (C)
threaded shaft on the inside of the junction box to
secure the transformer (C) to the junction box.
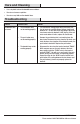
2
Wiring the transformer
Ƒ If needed, strip 1/2 in. of insulation from power
supply wires.
Ƒ Connect the transformer (C) wires to the power
supply wires in the junction box using UL
approved wire connectors (not included).
Ƒ Connect all white wires together.
Ƒ Connect all black wires together.
Ƒ Connect all ground (green or bare copper)
wires together.
Ƒ Check all connections and replace the cover
plate.
IMPORTANT: For metal junction boxes, it is required to connect the
green ground wire from the transformer (C) to the metal junction box
or clamp it to the metal conduit.
3
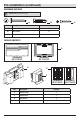
Installing new doorbell wire
(not included)
Ƒ If new wiring, route bell wire (not included)
from the transformer (C) to the doorbell
base(B) and both push buttons (D). Attach the
transformer (C) end of the three bell wires to
the low voltage screws on the transformer (C).
Ƒ Route bell wire from the doorbell base (B) to
each of the push buttons (D).
Ƒ Using masking tape, label all bell wire ends as
follows:
Ƒ “F” - Front door push button wire
Ƒ “T” - Transformer wire
Ƒ “R” - Rear door push button wire
UP
C
1
C
C
B
D
D