
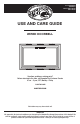
Instructions / Assembly


6
Installation (continued)
4
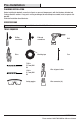
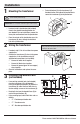
Mounting the doorbell base
Ƒ Route the wires through the wire entrance hole
in the doorbell base (B).
Ƒ Using the “UP” arrow indicator, place the
doorbell base (B) against the wall and mark
the two screw hole locations.
Ƒ Drill two 7/32 in. pilot holes and insert wall
anchors (BB).
Ƒ Attach the doorbell base (B) to the mounting
surface using the two large screws (AA) and
tighten securely.
FR
O
NT
REA
R
TR
AN
S
UP
UP
5
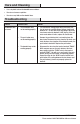
Wiring the doorbell
Ƒ Connect the doorbell wires to the doorbell
base (B):
Ƒ Wire “F” to screw terminal “FRONT”
Ƒ Wire “T” to screw terminal “TRANS”
Ƒ Wire “R” to screw terminal “REAR”
Ƒ Press the doorbell cover (A) onto the doorbell
base (B).
NOTE: To remove doorbell cover (A) after doorbell
base(B) is mounted, rmly grasp doorbell cover (A) and
pull.
NOTE: Push button(s) wired to the screw terminal
marked “FRONT” will play the “Ding-Dong” sound. Push
button(s) wired to the screw terminal marked “REAR” will
play the “Ding” sound.
FR
O
NT
REA
R
TR
AN
S
UP
6
Installing the push buttons
Ƒ Place one of the push buttons (D) on the
mounting surface where the bell wire exits and
verify it is level. Mark the mounting surface
through the two mounting holes and drill two
1/16 in. pilot holes.
Ƒ Attach the two bell wires to the screws on the
rear of the push button (D).
Ƒ Place the push button (D) on the mounting
surface and attach using two small screws (CC).
Ƒ Repeat the steps above for the other push
button (D).
Ƒ Turn power back on at fuse or junction box and
test system to verify it is working properly.
B
B
D
D
AA
CC