
Instructions / Assembly


5 HAMPTONBAY.com
Please contact 1-844-760-3644 for further assistance.
Installation - Wired Doorbell
2
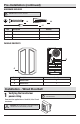
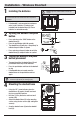
Removing the existing doorbell
Remove the cover from the existing doorbell
and label all wires with masking tape before
disconnecting:
“F” - Front door push button wire
“T” - Transformer wire
“R” - Rear door push button wire (if
applicable)
Disconnect all wires from existing doorbell and
remove doorbell from mounting surface.
FR
ON
T
REA
R
TRAN
S
R
T
F
3
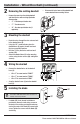
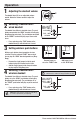
Mounting the doorbell
Route the wires through the wire entrance hole
in the doorbell base (B).
Using the “UP” arrow indicator, place the
doorbell base (B) against the wall and mark
the four screw hole locations.
Drill four 7/32 in. pilot holes and insert wall
anchors (BB).
Attach the doorbell base (B) to the mounting
surface using the four screws (AA) and tighten
securely.
SYNC – PRESS
AND RELEASE.
RESET – HOLD
10 SECONDS.
C
H
I
M
E
V
O
L
U
M
E
TUNE – HOLD
1 SECOND.
UP
FRONT TRANS REAR
4
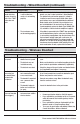
Wiring the doorbell
Connect the doorbell wires to the doorbell
base (A):
Wire “F” to screw terminal “FRONT”
Wire “T” to screw terminal “TRANS”
Wire “R” to screw terminal “REAR”
Snap the doorbell cover (A) onto the doorbell
base (B).
FRONT TRANS REAR
F
T
R
5
Installing the diode
NOTE: The doorbell will not play the entire musical
tune and the “TUNE” button will not work if a diode is not
installed on the main push button.
If a diode (CC) is not already installed on a
push button, loosen the two wiring screws on
the back of the existing push button and wrap
each of the ends of the diode (CC) around each
screw. Tighten the screws onto the diode (CC)
and wiring.
B
B
AA
CC
CC
Installation - Wired Doorbell (continued)