
Instructions / Assembly


6
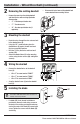
Installation - Wireless Doorbell
1
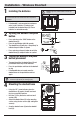
Installing the batteries
NOTICE: When using this doorbell with a transformer, batteries are
not needed and should not be installed even when using wireless
push buttons.
If the doorbell is not connected to transformer
wires, install 3 alkaline “C” batteries (not
included) into the doorbell base (B). Ensure
batteries are oriented correctly.
NOTE: In typical use, alkaline batteries will last up to
one year.
TYPE “C”
TYPE “C”
TYPE “C”
2
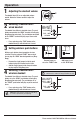
Syncing the doorbell and push
button
Press and release the “SYNC” button on the
doorbell base (B).
Press the push button within 30 seconds.
The doorbell base (B) will play a “Beep-Beep” to
indicate the push button is synced.
Press and release the push button to verify the
doorbell base (B) and push button are synced.
30
SYNC – PRESS
AND RELEASE.
RESET – HOLD
10 SECONDS.
TUNE – HOLD
1 SECOND.
3
Testing the doorbell and push
button placement
Temporarily position the doorbell base (B) and
push button where they will be mounted.
Press the push button and listen for the doorbell
to ring.
If the doorbell does not sound, move the
doorbell closer to the push button and test
again.
NOTE: Do not permanently mount the push button or
doorbell base (B) until they are working properly.
SYNC – PRESS
AND RELEASE.
RESET – HOLD
10 SECONDS.
C
H
I
M
E
V
O
L
U
M
E
TUNE – HOLD
1 SECOND.
UP
FRONT TRANS REAR
TYPE “C”
TYPE “C”
TYPE “C”
4
Mounting the doorbell base
Using the “UP” arrow indicator, place the
doorbell base (B) against the wall and mark
the four screw hole locations.
Drill four 7/32 in. pilot holes and insert wall
anchors (BB).
Attach the doorbell base (B) to the mounting
surface using the four screws (AA) and tighten
securely.
Snap the doorbell cover (A) onto the doorbell
base (B).
SYNC – PRESS
AND RELEASE.
RESET – HOLD
10 SECONDS.
C
H
I
M
E
V
O
L
U
M
E
TUNE – HOLD
1 SECOND.
UP
FRONT TRANS REAR
B
B
B
B
AA