
Instructions / Assembly


7 HAMPTONBAY.com
Please contact 1-844-760-3644 for further assistance.
Installation - Wireless Doorbell (continued)
3
Testing the doorbell and push
button placement
Temporarily position the doorbell base (B) and
push button where they will be mounted.
Press the push button and listen for the doorbell
to ring.
If the doorbell does not sound, move the
doorbell closer to the push button and test
again.
NOTE: Do not permanently mount the push button or
doorbell base (B) until they are working properly.
SYNC – PRESS
AND RELEASE.
RESET – HOLD
10 SECONDS.
C
H
I
M
E
V
O
L
U
M
E
TUNE – HOLD
1 SECOND.
UP
FRONT TRANS REAR
TYPE “C”
TYPE “C”
TYPE “C”
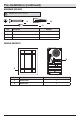
4
Rotating the cover pin
Before mounting the doorbell base (B) to the
wall, turn the doorbell base (B) vertically or
horizontally (depending upon the doorbell
cover (A)) and slide the cover pin out of the
doorbell base (B).
Turn the pin over and slide the cover pin into
the doorbell base (B).
5
Mounting the doorbell base
Using the “UP” arrow indicator, place the
doorbell base (B) against the wall and mark
the four screw hole locations.
Drill four 7/32 in. pilot holes and insert wall
anchors (BB).
Attach the doorbell base (B) to the mounting
surface using the four screws (AA) and tighten
securely.
Hang the doorbell cover (A) on the cover pin on
the doorbell base (B).
SYNC – PRESS
AND RELEASE.
RESET – HOLD
10 SECONDS.
C
H
I
M
E
V
O
L
U
M
E
TUNE – HOLD
1 SECOND.
UP
FRONT TRANS REAR
B
B
B
AA