
Instructions / Assembly


5 HAMPTONBAY.com
Please contact 1-844-760-3644 for further assistance.
Installation (continued)
3
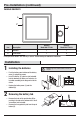
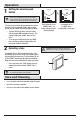
Testing the doorbell and push
button placement
Ƒ Temporarily position the push button (B) and
doorbell (A) where they will be mounted.
Ƒ Press the push button (B) to verify the
doorbell(A) and push button (B) work properly.
Ƒ If the doorbell (A) does not sound, move the
doorbell (A) closer to the push button (B) and
test again.
NOTE: Do not permanently mount the push button (B) or
doorbell (A) until they are working properly.
NOTE: The push button and doorbell come synced from
the factory. The range of the wireless doorbell can vary
with location, temperature, and battery condition.
4
Mounting the push button
Use either screws (AA) or double-sided tape (CC) to
mount the push button (B).
Ƒ To mount with screws (AA), remove the back
of the push button (B) by pushing in the tab
on the bottom with a small screwdriver. Place
the push button back on the door jamb and
mark the two screw holes. Drill two 1/16 in.
(1.5mm) pilot holes. Attach with screws (AA).
Ƒ When attaching the push button (B) with
double-sided tape (CC), remove the paper from
both sides of the double-sided tape (CC) and
apply to a clean surface.
Ƒ Snap on the front of the push button (B).
NOTE: Remove material in screw holes (if needed) before
mounting with screws.
5
Mounting the doorbell
Use the screws (AA) to mount the doorbell (A).
Ƒ Determine mounting location.
Ƒ Mark two level points 3.0 in. (7.6 cm) apart on
the mounting surface.
Ƒ Drill two 7/32 in. (5.5 mm) pilot holes and
insert the wall anchors (BB).
Ƒ Insert the screws (AA) into the wall
anchors(BB) leaving about 1/8 in. (3.2 mm) of
the screw threads exposed.
Ƒ Hang the doorbell (A) on the screws (AA) using
the keyholes on the back of the doorbell (A).
TUNE – HOLD
1 SECOND.
SYNC – HOLD
3 SECONDS.
RESET – HOLD
10 SECONDS.
A
A
B
AA
AA
BB