
Instructions / Assembly


6
Installation (continued)
6
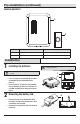
Attaching the doorbell to the
back plate
Ƒ Align the top edge of the doorbell (A) with the
top of the back plate (1).
Ƒ Rotate the bottom of the doorbell (A) toward
the back plate (1) and snap into position.
Operation
1
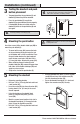
Selecting a tune
The wireless push button (B) has two options for tune
selection: Play the selected “FRONT” door tune (Ding-
Dong) or play the “REAR” door designated tune (Ding)
Ƒ The push button (B) comes from the factory
with no jumper (EE) installed on the pins.
This setting will play the “FRONT” door tune
(Ding-Dong).
Ƒ To set the push button (B) to play the “REAR”
door tune (Ding), add the jumper (EE) to the
pins inside the push button (B).
NOTE: All doorbell models are designed to work with up
to 5 wireless push buttons (sold separately).
NOTE: All doorbells are designed to play only two
different tunes no matter how many push buttons are used.
Push button (B) set as
“FRONT” door (Ding-
Dong) – no jumper (EE) on
the pins (Factory Default)
Push button (B) set as
“REAR” door (Ding) –
jumper(EE) is on the pins
CR2032 CR2032
Care and Cleaning
Ƒ Use a dry cloth to clean the doorbell and push button.
Ƒ Do not use cleaners or polishes.
Ƒ Do not use any uids on the doorbell or push button.
EE
1A
B