
Instructions / Assembly


3
Carefully tuck all the wires and wire
connections into the outlet box.
Place the fixture pan (A) over the outlet
box and feed the mounting screws (BB)
through the keyhole slots.
Slide the fixture pan (A) so that the
mounting screws (BB) slide into the
narrow ends of the keyhole slots.
Tighten the mounting screws (BB) so that
the fixture pan (A) is secured flush
against the ceiling.
4A
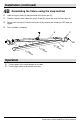
Assembling the fixture using the slide method
Place one end cap (C) on the fixture pan
(A) and secure it by screwing the thumb
nut (DD) onto the nipple at the end of the
end cap (C).
Slide the acrylic shade (B) into place and
secure the other end cap (C) into the
fixture pan (A) by securing the thumb nut
(DD) onto the nipple.
The installation is complete.
Installation (continued)
6
A
C
DD
Securing the fixture base
A
BB
CC
NOTE: If you do not have sufficient room to slide
the acrylic shade (B) into the fixture pan (A),
proceed to installation instruction 4B.
A
B
C
DD