Item 1003 418 679 1005 605 047 Model HB2592-34 HB2592-34D USE AND CARE GUIDE PENDANT LIGHT HASTINGS Questions, problems, missing parts? Before returning to the store, call Hampton Bay Customer Service 8 a.m. – 7 p.m., EST, Monday – Friday, 9 a.m. – 6 p.m., EST, Saturday 1-800-841-1350 HAMPTONBAY.COM THANK YOU We appreciate the trust and confidence you have placed in Hampton Bay through the purchase of this pendant light. We strive to continually create quality products designed to enhance your home.
Table of Contents Table of Contents Safety Information Warranty Pre-Installation Planning the Installation Tools Required Hardware Included Package Contents 2 2 2 3 3 3 3 4 Installation Operation Care and Cleaning Exterior Maintenance Interior Maintenance Troubleshooting 5 7 7 7 7 7 Safety Information Before starting installation of this fixture or removal of a previous fixture, disconnect the power by turning off the circuit breaker or by removing the fuse at the fuse box.
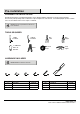
Pre-installation PLANNING THE INSTALLATION Read all instructions before assembly and installation. Before starting installation of the fixture or removal of a previous fixture, disconnect the power by turning off the circuit breaker or by removing the fuse at the fuse box. To avoid damaging this product, assemble it on a soft, non-abrasive surface such as carpet or cardboard. NOTE: Keep your receipt and these instructions for Proof of Purchase.
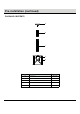
Pre-installation (continued) PACKAGE CONTENTS A B C E D Part Description Quantity A Canopy 1 B Short Tube 2 C Long Tube 2 D Shade 1 E Socket 1 4
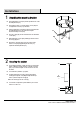
Installation 1 Attaching the mounting bracket Thread the fixture screws ((() into the provided holes of the mounting bracket ())). Thread the hex nuts (CC) onto the fixture screws (((). Do not tighten the hex nuts (CC) at this time. Pull the supply wires out from the outlet box and mount the mounting bracket ())) to the outlet box using the bracket mounting screws (''). )) Place the canopy (A) over the outlet box and onto the fixture screws ((().
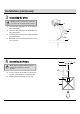
Installation (continued) 3 Connecting the wires NOTE: If you have electrical questions consult your local electrical code for approved grounding methods. )) Connect the black supply wire to the smooth fixture wire using a wire nut (BB). BB Connect the white supply wire to the ribbed fixture wire using a wire nut (BB). Connect the fixture ground wire to the supply ground wire using a wire nut (BB). Wrap all wire connections with electrical tape for a more secure connection.
Operation Turn on power at the circuit breaker or fuse box. Turn the light switch on to activate the fixture. Care and Cleaning EXTERIOR MAINTENANCE NOTE: Do not use any cleaners with chemicals, solvents, or harsh abrasives. Use only a dry soft cloth to dust or wipe carefully. Use a dry or slightly dampened clean cloth and wipe the surface of the fixture. INTERIOR MAINTENANCE Disconnect power to the fixture by turning off the circuit breaker or by removing the fuse at the fuse box.
Questions, problems, missing parts? Before returning to the store, call Hampton Bay Customer Service 8 a.m. – 7 p.m., EST, Monday – Friday, 9 a.m. – 6 p.m., EST, Saturday 1-800-841-1350 HAMPTONBAY.COM Retain this manual for future use.
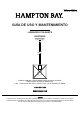
Artículo 1003 418 679 1005 605 047 Modelo HB2592-34 HB2592-34D GUÍA DE USO Y MANTENIMIENTO LUMINARIO COLGANTE HASTINGS Preguntas, problemas, o piezas faltantes? Antes de regresar a la tienda, llama al Servicio al Cliente de Hampton Bay 8 a.m. – 7 p.m Hora del Este, Lunes – Viernes, 9 a.m. – 6 p.m., Hora del Este, Sábado 1-800-841-1350 HAMPTONBAY.COM GRACIAS Le agradecemos la confianza que han depositado en Hampton Bay a través de la compra de este luminario colgante.
Tabla de Contenidos Tabla de Contenidos Información de Seguridad Garantía Pre-Instalación Planificación de la Instalación Herramienta Necesarias Ferretería Incluida Contenido del Paquete 10 10 10 11 11 11 11 12 Instalación Operación Cuidado y Limpieza Mantenimiento del Exterior Mantenimiento del Interior Solución de Problemas 13 15 15 15 15 15 Información de Seguridad Antes de iniciar la instalación de este aparato o la eliminación de un accesorio anterior, desconecte la alimentación apagando el disyu
Pre-instalación PLANIFICACIÓN DE LA INSTALACIÓN Lea todas las instrucciones antes del montaje e instalación. Antes de comenzar la instalación de la luminaria o el retiro de un artefacto anterior, desconecte la alimentación apagando el disyuntor o quitando el fusible en la caja de fusibles. Para evitar daños a este producto, montarlo en una superficie suave y no abrasiva, como una alfombra o cartón. NOTA: Guarde su recibo y estas instrucciones para comprobante de compra.
Pre-instalación (continuado) CONTENIDO DEL PAQUETE A B C E D Parte Descripción Cantidad A Cubierta 1 B Tubo Corto 2 C Tubo Largo 2 D Pantalla 1 E Zócalo 1 12
Instalación 1 Sujetando la ménsula de montaje Enrosque los tornillos del luminario ((() en los agujeros provistos en la ménsula de montaje ())). Enrosque las tuercas hexagonales (CC) en los tornillos del luminario (((). No apriete las tuercas hexagonales (CC) en este momento. Saque los cables de alimentación de la caja de distribución y monte la ménsula de montaje ())) sobre la caja de distribución utilizando los tornillos de montaje ('').
Instalación (continuado) 3 Conectando los cables NOTA: Si tiene dudas con las conexiones eléctricas, consulte el código eléctrico de su localidad para los métodos aprobados para las conexiones a tierra. )) Conecte el cable negro de alimentación con el cable liso usando una tuerca de cables (BB). BB Conecte el cable blanco de alimentación con el cable acanalado usando una tuerca de cables (BB).
Operación Conecte la alimentación en el disyuntor o caja de fusibles. Gire el interruptor de la luz para activar el aparato. Cuidado y Limpieza MANTENIMIENTO DEL EXTERIOR NOTA: No use limpiadores con químicos, solventes o abrasivos fuertes. Use sólo un paño seco para sacudir o limpiar con cuidado. Use un paño limpio y seco o ligeramente humedecido y limpie la superficie de la linterna.
Preguntas, problemas, o piezas faltantes? Antes de regresar a la tienda, llama al Servicio al Cliente de Hampton Bay 8 a.m. – 7 p.m Hora del Este, Lunes – Viernes, 9 a.m. – 6 p.m., Hora del Este, Sábado 1-800-841-1350 HAMPTONBAY.COM Conserve este manual para futuras consultas.
Article 1003 418 679 1005 605 047 Modèle HB2592-34 HB2592-34D GUIDE D'UTILISATION ET D'ENTRETIEN LUMINAIRE DU SUSPENSION HASTINGS Questions, problèmes, pièces manquantes? Avant de retourner au magasin, appeler Hampton Bay Service à la clientèle 8:00 – 19:00, HNE, Lundi – Vendredi, 9:00 – 18:00, HNE, Samedi 1-800-841-1350 HAMPTONBAY.COM MERCI Nous apprécions la confiance que vous avez placée dans Hampton Bay grâce à l'achat de cette luminaire du suspension.
Table des Matières Table des Matières Consignes de Sécurité Garantie Pré-Installation Planification du l’Installation Outils Requis Matériel Inclus Contenu du Paquet 18 18 18 19 19 19 19 20 Installation Opération Entretien et Nettoyage Entretien Extérieur Entretien Intérieur Dépannage 21 23 23 23 23 23 Consignes de Sécurité Avant de commencer l'installation de ce luminaire ou à la dépose d'un précédent luminaire, débrancher l'alimentation en désactivant le disjoncteur ou en retirant le fusible de la p
Pré-installation PLANIFICATION DE L'INSTALLATION Lire toutes les instructions avant assemblage et l'installation. Avant de commencer l'installation du luminaire ou la dépose d'un précédent luminaire, débrancher l'alimentation en désactivant le disjoncteur ou en retirant le fusible de la platine de fusibles. Pour éviter d'endommager le produit, assembler sur un doux et non abrasif surface tels que tapis ou un morceau de carton. NOTE : Conservez votre reçu et ces instructions à la preuve d'achat.
Pré-installation (suite) CONTENU DU PAQUET A B C E D Partie Description Quantité A Pavillon 1 B Tube Court 2 C Tube Long 2 D Abat-jour 1 E Douille 1 20
Installation 1 Le montage du plaque de fixation Visser les vis du luminaire ((() dans les trous prévus sur la plaque de fixation ())). Vissez les écrous hexagonaux (CC) sur les vis de luminaire (((). Ne pas serrer les écrous hexagonaux (CC) pour l’instant. Tirer les fils d’alimentation hors de la boîte de sortie et installer la plaque de fixation ())) sur la boîte de sortie à l’aide des vis de montage ('').
Installation (continué) 3 La connexion des fils NOTE: Si vous avez des questions concernant l’installation électrique, veuillez consulter le code de l’électricité en vigueur dans votre province pour connaître les méthodes de mise à la terre approuvées. )) Reliez le fil d’alimentation noir au fil noir du luminaire à l’aide d’un capuchon de connexion (BB). BB Reliez le fil d’alimentation blanc au fil blanc du luminaire à l’aide d’un capuchon de connexion (BB).
Opération Mettez sous tension au niveau du disjoncteur ou des fusibles. Allumez l'interrupteur pour activer l'appareil. Entretien et Nettoyage NOTE : N’utilisez aucun produit de nettoyage contentant des agents chimiques, des solvants ou des abrasifs durs. Utilisez uniquement un linge doux et sec pour enlever la poussière en essuyant délicatement ENTRETIEN EXTÉRIEUR Utilisez un linge sec ou légèrement humide et essuyez le luminaire.
Questions, problèmes, pièces manquantes? Avant de retourner au magasin, appeler Hampton Bay Service à la clientèle 8:00 – 19:00, HNE, Lundi – Vendredi, 9:00 – 18:00, HNE, Samedi 1-800-841-1350 HAMPTONBAY.COM Conserver ce manuel pour un utilisation ultérieure.