Item: TBA Model: HBP609-35 USE AND CARE GUIDE ____________________________________ SWING ARM LAMP Questions, problems, missing parts? Before returning to the store, call Hampton Bay Customer Service 8 a.m. – 7 p.m., EST, Monday – Friday 9 a.m. – 6 p.m., EST, Saturday 1-855-HD-HAMPTON HAMPTONBAY.COM THANK YOU We appreciate the trust and confidence you have placed in Hampton Bay through the purchase of this swing arm lamp. We strive to continually create quality products designed to enhance your home.
Table of Contents Table of Contents Safety Information Warranty Pre-Installation Planning the Installation Tools Hardware Package Contents 2 2 2 3 3 3 3 4 Installation Operation Care and Cleaning Exterior Maintenance Troubleshooting 5 7 7 7 7 Safety Information Before starting installation of this fixture or removal of a previous fixture, disconnect the power by turning off the circuit breaker or by removing the fuse at the fuse box.
Pre-Installation PLANNING THE INSTALLATION Read all instructions before assembly and installation. Before starting installation of the fixture or removal of a previous fixture, disconnect the power by turning off the circuit breaker or by removing the fuse at the fuse box. To avoid damaging this product, assemble it on a soft, non-abrasive surface such as carpet or cardboard. NOTE: Keep your receipt and these instructions for Proof of Purchase.
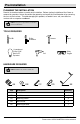
Pre-Installation (continued) PACKAGE CONTENTS A B C D Part Description Quantity A Lampshade 1 B Harp 1 C Main Fixture Body 1 D Cord Cover 3 4
Installation 1 Attaching the mounting bracket Place the mounting bracket (EE) onto the desired location and mark the location of the mounting holes. Remove the mounting bracket (EE), drill appropriately sized holes at the marked wall locations, and insert wall anchors (DD) into the wall holes. Replace the mounting bracket (EE) onto the desired location. Feed the mounting screws (CC) through the mounting holes of the mounting bracket (EE) and thread them into the wall anchors (DD).
Installation (continued) 3 Assembling the fixture AA NOTE: Do not exceed a 150 watt incandescent light bulb or 32 watt SBCFL. For more information on the proper lighting to use, see www.homedepot.com/lightingfacts. Attach the harp (B) to the socket cup of the main fixture body (C). Screw the light bulb into lamp’s socket. Place the shade (A) on top of the harp (B). Secure the shade (A) to the harp (B) using the finial (AA). Slide all the cord covers (D) up the cord.
Operation Connect the polarized plug to a standard 110/120 V wall receptacle. Turn the switch once to turn the light on low. Turn the switch again to cycle through the settings. The following is the switch sequence. OFF LOW MED HIGH Care and cleaning EXTERIOR MAINTENANCE NOTE: Do not use any cleaners with chemicals, solvents, or harsh abrasives. Use only a dry soft cloth to dust or wipe carefully. Disconnect fixture’s plug from wall receptacle.
Questions, problems, missing parts? Before returning to the store, call Hampton Bay Customer Service 8 a.m. – 7 p.m., EST, Monday-Friday 9 a.m. – 6 p.m., EST, Saturday 1-855-HD-HAMPTON HAMPTONBAY.COM Retain this manual for future use.
Artículo: TBA Modelo: HBP609-35 GUÍA DE USO Y MANTENIMIENTO ____________________________________ LÁMPARA CON BRAZO MÓVIL Preguntas, problemas, o piezas faltantes? Antes de regresar a la tienda, llama al Servicio al Cliente de Hampton Bay 8 a.m. – 7 p.m., Hora del Este, Lunes – Viernes 9 a.m. – 6 p.m., Hora del Este, Sabado 1-855-HD-HAMPTON HAMPTONBAY.COM GRACIAS Le agradecemos la confianza que han depositado en Hampton Bay a través de la compra de esta lámpara con brazo móvil.
Tabla de Contenidos Tabla de Contenidos Información de Seguridad Garantía Pre-Instalación Planificación de la Instalación Herramienta Ferretería Contenido del Paquete 10 10 10 11 11 11 11 12 Instalación Operación Cuidado y Limpieza Mantenimiento Exterior Solución de Problemas 13 15 15 15 15 Información de Seguridad Antes de iniciar la instalación de este aparato o la eliminación de un accesorio anterior, desconecte la alimentación apagando el disyuntor o quitando el fusible en la caja de fusibles.
Pre-Instalación PLANIFICACIÓN DE LA INSTALACIÓN Lea todas las instrucciones antes del montaje e instalación. Antes de comenzar la instalación de la luminaria o el retiro de un artefacto anterior, desconecte la alimentación apagando el disyuntor o quitando el fusible en la caja de fusibles. Para evitar daños a este producto, montarlo en una superficie suave y no abrasiva, como una alfombra o cartón. NOTA: Guarde su recibo y estas instrucciones para comprobante de compra.
Pre-Instalación (continuado) CONTENIDO DEL PAQUETE A B C D Parte Descripción Cantidad A Pantalla 1 B Arco de Soporte 1 C Cuerpo Principal 1 D Cobertor de Cables 3 12
Instalación 1 Sujetando la ménsula de montaje Coloque la ménsula de montaje (EE) en el lugar deseado y marque la ubicación de los agujeros de montaje. Retire la ménsula de montaje (EE), taladre agujeros del tamaño adecuado en los lugares marcados en la pared, y inserte los anclajes de pared (DD) en los agujeros. Vuelva a colocar la ménsula de montaje (EE) en el sitio deseado.
Instalación (continuado) 3 Ensamblando el Luminario NOTA: No exceda una bombilla incandescente de 150 vatios o un SBCFL de 32 vatios. Para obtener más información sobre la iluminación adecuada que debe utilizar, consulte www.homedepot.com/lightingfacts. Inserte el arco de soporte (B) en el zócalo del cuerpo principal (C). Enrosque la bombilla en el zócalo. Coloque la pantalla (A) por encima del arco de soporte (B). Fije la pantalla (A) al arco de soporte (B) usando el tope (AA).
Operación Conecte el enchufe polarizado a un toma corriente de pared estándar de 110/120 vatios. Gire el interruptor una vez para encender la luz baja. Gire el interruptor nuevamente para alternar entre los ajustes. La siguiente es la secuencia del interruptor: APAGADO BAJO MEDIO ALTO Cuidado y limpieza MANTENIMIENTO DEL EXTERIOR NOTA: No use limpiadores con químicos, solventes o abrasivos fuertes. Use sólo un paño seco para sacudir o limpiar con cuidado.
Preguntas, problemas, o piezas faltantes? Antes de regresar a la tienda, llama al Servicio al Cliente de Hampton Bay 8 a.m. – 7 p.m., Hora del Este, Lunes – Viernes 9 a.m. – 6 p.m., Hora del Este, Sábado 1-855-HD-HAMPTON HAMPTONBAY.COM Conserve este manual para futuras consultas.
Article: TBA Modèle: HBP609-35 GUIDE D'UTILISATION ET D'ENTRETIEN ____________________________________ LAMPE SUR BRAS PIVOTANT Questions, problèmes, pièces manquantes? Avant de retourner au magasin, appeler Hampton Bay Service à la clientèle 8:00 – 19:00, HNE, Lundi – Vendredi 9:00 – 18:00, HNE, Samedi 1-855-HD-HAMPTON HAMPTONBAY.COM MERCI Nous apprécions la confiance que vous avez placée dans Hampton Bay grâce à l'achat de cette lampe sur bras pivotant.
Table des Matières Table des Matières Consignes de Sécurité Garantie Pré-Installation Planification du l’Installation Outils Matériel Contenu du Paquet 18 18 18 19 19 19 19 20 Installation Opération Entretien et Nettoyage Entretien Extérieur Dépannage 21 23 23 23 23 Consignes de Sécurité Avant de commencer l'installation de ce luminaire ou à la dépose d'un précédent luminaire, débrancher l'alimentation en désactivant le disjoncteur ou en retirant le fusible de la platine de fusibles.
Pré-Installation PLANIFICATION DE L'INSTALLATION Lire toutes les instructions avant assemblage et l'installation. Avant de commencer l'installation du luminaire ou la dépose d'un précédent luminaire, débrancher l'alimentation en désactivant le disjoncteur ou en retirant le fusible de la platine de fusibles. Pour éviter d'endommager le produit, assembler sur un doux et non abrasif surface tels que tapis ou un morceau de carton. NOTE: Conservez votre reçu et ces instructions à la preuve d'achat.
Pré-Installation (continue) CONTENU DU PAQUET A B C D Partie Description Quantité A Abat-jour 1 B Lyre 1 C Corps du Luminaire 1 D Cache-fils 3 20
Installation 1 Le montage du plaque de fixation Placez le support de montage (EE) à l’endroit désiré et marquez l’emplacement des trous de montage. Retirez le support de montage (EE), percer des trous de dimension adéquate dans la paroi du mur, et insérez les ancrages muraux (DD) dans les trous. Replacez le support de montage (EE) à l’endroit désiré. Faites passer les vis de montage (CC) dans les trous de montage du support (EE) et vissez-les dans les ancrages muraux (DD).
Installation (continue) 3 Assemblage de luminaire AA NOTE: La puissance de l’ampoule incandescente ne doit pas dépasser 150 watts ou un lampe fluocompacte à ballast intégré ne doit pas dépasser 32 watts. Pour plus d'informations sur l'éclairage adéquat à utiliser, voir www.homedepot.com/lightingfacts. Fixez la lyre (B) sur le boîtier de douille du corps du luminaire (C). Vissez la lampe dans la douille du luminaire. Placez l’abat-jour (A) sur le dessus de la lyre (B).
Opération Branchez la fiche polarisée dans une prise murale standard de 110/120 V. Tournez l'interrupteur une fois pour allumer la lumière faible. Tournez l'interrupteur pour faire défiler les réglages. Voici la séquence de commutation. OFF FAIBLE MEDIUM ÉLEVÉE Entretien et Nettoyage NOTE: N’utilisez aucun produit de nettoyage contentant des agents chimiques, des solvants ou des abrasifs durs.
Questions, problèmes, pièces manquantes? Avant de retourner au magasin, appeler Hampton Bay Service à la clientèle 8:00 – 19:00, HNE, Lundi – Vendredi 9:00 – 18:00, HNE, Samedi 1-855-HD-HAMPTON HAMPTONBAY.COM Conserver ce manuel pour un utilisation ultérieure.