
Instructions / Assembly


Page 7
INSTALLATION INSTRUCTIONS:
Note: This product requires a Hampton Bay track that is pre-installed. Installation onto any other
brand track may not work.
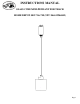
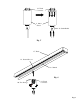
1. Select the desired location on the Track (#17) for the Pendant (#1).
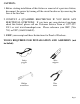
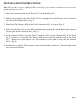
2. Identify the grounded side of the Track (#17) by finding the Ground Groove (#18) located on
one side of the Channel (#19). (Fig. 3)
3. Identify the Two Prongs (#20) of the Track Connector (#21), as shown. (Fig. 4)
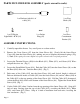
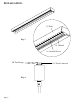
4. Pull down the Outer Sleeve (#8) while simultaneously pushing the Strain Relief (#22) upward,
exposing the Track Connector (#21). (Fig. 5)
5. At the selected location, insert the Track Connector (#21) into the Channel (#19) of the Track
(#17) and twist it so that the Two Prongs (#20) turn toward the grounded side of the Track
(#17). Release the Outer Sleeve (#8), but continue to twist until it snaps into the Channel
(#19). (Fig. 6)
6. Installation is complete. Turn on power at the circuit breaker or fuse box. Turn the light switch
on to activate the fixture.