
Instructions / Assembly

Item #1001 492 696
Model #HD28784
Use and Care Guide
LOW VOLTAGE WALK LIGHT
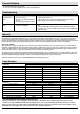
PACKAGE CONTENTS
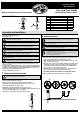
Assembly and Installation
1
Attaching and installing the light
2
Connecting the wires
WARNING: Never push the xture into the ground by the lamp body (A) or use a
hammer to insert the spike (G) into the ground.
WARNING: The wire connector (F) contacts have sharp edges for piercing the
main low voltage cable. To avoid injury, do not touch the metal contacts.
CAUTION: The wire from the low voltage power unit shall be 12-16 AWG type
underground low Energy Circuit Cable or SPT2W.
CAUTION: Safe for outdoor operation
WARNING: To reduce the risk of FIRE OR INJURY TO PERSONS:
WARNING: Turn off/unplug and allow to cool before replacing lamp.
WARNING: Lamp gets HOT quickly! Contact only switch/plug when turning on.
Do not touch hot lens, guard or enclosure.
WARNING: Keep the lamp away from materials that may burn.
WARNING: Do not touch the lamp at any time. Use a soft cloth. Oil from skin may
damage the lamp.
IMPORTANT:
• Protect the wiring by routing it in close proximity to the light tting, or next to a
building structure such as a house or deck.
• The landscape wire and connector can also be hidden under stone or buried
under grass at a maximum depth of 6” (15.24 cm).
• Do not submerge xture in water.
qCarefully remove the xture from its protective packaging.
q Pass the wire through the spike (G).
q Fix both post sections (E) together by turning clockwise.
qAttach the spike (G) by pushing it into the lower post section.
qInsert the bulb (B) into the bulb socket.
qAttach the body by pushing the lens (C) onto the post.
qPut the metal disks (D) on the lens by guiding them between the ribs on
the lens and turn clockwise to secure them.
qAttach the cover (A) to the lens by turning clockwise.
WARNING: Risk of Electric Shock. Install all luminaires 10 ft. (3.05 m) or more
from a pool, spa or fountain.
WARNING: Install in accordance with all local codes and ordinances.
qPlace the wire connector (F) on opposite sides of the low voltage
cable (not included) where the xture will be located.
qAlign and t the main low voltage cable vertically to the slot of the
wire connector (F) as shown.
qPress the wire connector (F) together until fully seated and locked
around the cable. Pre-set prongs will pierce the cable insulation
and establish contact. Turn on the power unit. If the light xture
does not turn on, repeat the previous steps.
qOnce the clip-on connector (F) is in place, it is recommended to
wrap it with electrical tape for additional protection.
qCAUTION BE CAREFUL! THE WIRE STABS ARE VERY SHARP!
qAfter all xtures are installed, turn on the transformer.
F
Only for use with low voltage power units with a maximum output rating of 15V,
300W per secondary.
FOR LANDSCAPE LIGHTING SYSTEMS ONLY. OUTDOOR USE ONLY. THE DEVICE IS
ACCEPTED AS A COMPONENT OF A LANDSCAPE LIGHTING SYSTEM WHERE THE
SUITABILITY OF THE COMBINATION SHALL BE DETERMINED BY CSA OR LOCAL
INSPECTION AUTHORITIES HAVING JURISDICTIO
N.
UL LISTED UNDER MODEL # GL22784
Please read and save these instructions
INSTRUCTIONS PERTAINING TO A RISK OF FIRE, OR INJURY TO PERSONS
IMPORTANT SAFETY INSTRUCTIONS
Lighted lamp is HOT!
Part Description Quantity
A
Top cover
1
B
7W Incandescent T5 Wedge Base Bulb
1
C
Lens
1
D
Tier
2
E
Post
2
F
Connector
1
G
Spike
1
A
B
C
D
F
E
G
A
B
C
D
E
G