
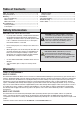
Instructions / Assembly


□
□
6
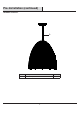
Making the electrical connections
Installation (continued)
6
AA
CC
Green ground screw
* Use wire connectors (CC) to connect the wires.
Ground Wire:
1. Wrap the supply ground wire around the green ground
screw on the crossbar (AA), no less than 2 in. from the end of
the wire. Tighten the ground screw.
2. Connect the xture ground wire to the supply ground wire
with a wire connector (CC).
Supply Wire:
1. Connect the supply white wire to the white xture supply
wire with a wire connector (CC).
2. Connect the supply black (or red) wire to the black xture
supply wire with a wire connector (CC).
3. Wrap each connection with approved electrical tape and
carefully insert all of the connected wires into the outlet box.
□
□
□
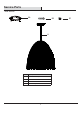
5
Cut and strip wires
Conrm the desired hanging height. Refer to step 4 if
adjustments are needed.
Using wire cutters, cut the xture cord leaving
approximately 10 inches of wire extending from the
canopy. On the xture cord, remove 4 inches of the
outer sleeve.
Using wire strippers, strip each wire 1/2 inch from the
end.
□
□
Adjust the cord length
4
Loosen the set screw on the coupling on the underside of the ceiling canopy.
Adjust the cord in or out of the ceiling canopy according to your hanging
height.
Tighten the set screw on the coupling once your hanging height is achieved.
Recommended length, from the top of canopy to bottom of socket, when
mounting above a 30 inch high table:
8 foot ceiling: Adjust cord length to 12 in. from the coupling to the ceiling
9 foot ceiling: Adjust cord length to 24 in. from the coupling to the ceiling
10 foot ceiling: Adjust cord length to 36 in. from the coupling to the ceiling
11 foot ceiling: Adjust cord length to 48 in. from the coupling to the ceiling
12 foot ceiling: Adjust cord length to 60 in. from the coupling to the ceiling
Set Screw
Cord
Coupling
Coupling
Ceiling Canopy