
Instructions / Assembly


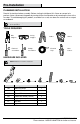


6
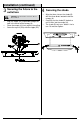
Installation (continued)
3
Securing the fixture to the
outlet box
4
Securing the shade
□ Align the nipple (EE) to protrude through the
hole in the center of the canopy (A).
□ Place the canopy (A) firmly against the ceiling.
□ Screw the cap nut (GG) onto the nipple (EE).
CAUTION: The canopy (A) is one piece. Do not
disassemble it.
□ Align the three slots on the shade (B)
with the three divots located inside the
canopy (A).
□ Carefully turn the shade (B) clockwise
until it locks into the canopy (A).
□ The shade (B) only turns about 1/4 of a
turn. Do not over tighten.