
Installation Guide


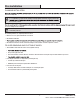
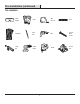


Table Of Contents

6
Installation (continued)
4
Mounting the Countertop to your
Cabinets
□ Mount the countertop to the cabinet frame or drill overized
holes in your support blocks.
□ Using washers, screw the countertop all the way, then
withdraw the screw by a quarter turn to preserve the
natural wood work, while keeping the countertop in
position.
5
Joining Countertops
COMMON JOINT METHODS
Butt Joint: For best dimensional stability we suggest using a butt
joint for 90-degree transition.
NOTE: Some product will have a radius on the edge large
enough that it will need to be trimmed off. Using a router
or circular saw with a straight edge, cut off the radius just
short of the width of the piece you are joining to. Then with
a jig saw or le you will need to chamfer a 45-degree miter
so each radius will join nicely at the seam.
Miter Joint: Another option is to cut both pieces at a 45-degree
angle.
NOTE: This joint can be more difcult to cut and can
be prone to opening at either end of the miter over time
because each board may expand/contract differently.
COMMON JOINERY METHODS
□ Miter Bolt: Use at least 3 miter bolts for a 24 inch countertop
spaced appropriately to keep joint tight along the full length.
□ Biscuit/Mortise and Tenon joint: Use 3 to 4 biscuit/tenons for
a 24 inch countertop. To pull this joint together you will need
to join by using a:
□ Pocket bore xture that can drill angular holes to use
screws to pull it tight.
□ Temporary clamp block: Screw a block on the bottom of
each piece parallel with the joint line, then attach and
tighten clamps till joint is tight.
Butt joint with miter bolts
Miter joint with biscuit/tenons and pocket bore