
Instructions / Assembly
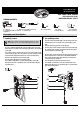


2
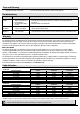
Assembly and Installation (continued)
Installing the fixture on a surface using plastic anchors
2
Connecting the wires
□
If installation requires the plastic anchors (BB), then place the cardboard
template (CC) on the mounting surface and mark where the holes should
be for the self-threading screws (AA).
□
At those marks, use a 15/64 drill bit (or 6 mm) to drill two holes in the
mounting surface.
□
Push the plastic anchors (BB) into the two holes until the heads of the
plastic anchors (BB) are flush with the mounting surface.
□
Continue the assembly using either of the applicable Step 1 procedures
on page 1.
WARNING: The wire connector (C) contacts have sharp edges for
piercing the main low voltage cable. To avoid injury, do not touch
the metal contacts.
CAUTION: The wire from the low voltage power unit should be 12-
16 AWG type underground low Energy Circuit Cable.
IMPORTANT:
□
Protect the wiring by routing it in close proximity to the light
fitting, or next to a building structure such as a house or a
deck.
□
The landscape wire and connector can also be hidden under
stone or buried under grass at a maximum depth of 6 in.
(15.24 cm).
□
Do not install the fixture within 10 ft. of a pool, spa, or fountain.
□
Do not submerge the fixture in water.
□
Place the wire connector (C) on opposite sides of the low voltage
cable (not included) from the transformer (not included) where the
fixture will be located.
□
Align and fit the main low voltage cable vertically to the slot of the
wire connector (C).
□
Press the wire connector (C) together until it is locked around the
main low voltage cable. The pre-set prongs will pierce the cable
insulation and establish contact with the electrical wire inside.
□
Once the wire connector (C) is in place, it is recommended to wrap
it with electrical tape (not included).
□
After all fixtures are installed, turn on the transformer.
CC
A
A
A
B
D
BB
A
A
C