
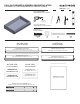
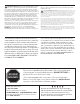
Installation Guide

3
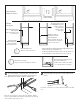
Take (DSL) and align inside dowel holes with the (DE)
dowels and firmly press together while making sure
the (DB) is inserted into the lower groove. Use the two (S7)
screws and screw them into the top holes on both ends of
the (DSL).
1
In this step you will need the (DSR), 2x (DE), 4x (WD)
and 2x (S7) wood screws. Insert one (WD) into the
lower holes on both ends of each (DE). Make sure the (DE)
groove is on the inside, insert the (WD) dowel into the lower
hole on the (DSR) and firmly press together, then insert the
(S7) screw into the top hole of the (DSR) and screw in the
(S7) screw. Repeat this for both (DE).
DO NOT OVERTIGHTEN SCREWS
En este paso se necesitarán (DSR), 2x (DE), 4x (WD) y 2 tornillos
para madera (S7). Insertar un (WD) en los orificios inferiores a
ambas lados de cada (DE). Asegurar que la ranura del (DE) quede
dentro e insertar la clavija (WD) en el orificio inferior del (DSR)
para presionarlos juntos con firmeza e insertar enseguida el tornil-
lo (S7) en el orificio superior del (DSR) para atornillar (S7). Repetir
este paso para ambos (DE).
NO APRETAR DEMASIADO LOS TORNILLOS
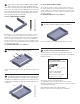
4
The fully assembled drawer should look like this.
El cajón completamente ensamblado debe quedar como este.
step 5
step 5
DO NOT OVERTIGHTEN SCREWS
Toma el (DSL) y alinea los orificios interiores de las clavijas con
las clavijas del (DE) y presiona firmemente mientras te aseguras
de que el (DB) esté insertado en la ranura inferior. Inserta los dos
tornillos (S7) dentro de los orificios superiores en ambos extremos
del (DSL) y atornilla.
NO APRETAR DEMASIADO LOS TORNILLOS
2
Insert Drawer Bottom wood grain side up.
Inserta el fondo del cajón con el lado de la veta de la madera hacia
arriba.
step 5
5
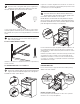
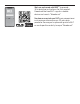
HOLE LOCATION AND DRILLING GUIDE
Use the template to mark all of the desired locations for
holes, then drill with a 10mm bit (preferred) or 3/8” drill bit
to drill your holes.
Ubicación de Orificios y Guía de Perforación
Usa la plantilla para marcar todas las ubicaciones de orificio
deseadas y seguidamente taladra los orificios con una broca de 10
mm (preferida) o de 3/8 plg.
Align with back and bottom edge of cabinet
Alinea con la parte posterior y borde inferior del gabinete
TOOLS REQUIRED*
HERRAMIENTAS NECESARIAS*
10mm or 3/8” Drill Bit,
3mm or 1/8” Drill Bit
Broca de 10 mm o de 3/8 plg,
Broca de 3 mm o 1/8 plg
Base Cabinet
Gabinete de base
Pantry
Despensa
Align template against bottom panel
Alinear la plantilla con los paneles inferior
Align template against side panel
Alinear la plantilla con los paneles lateral
Mark bottom holes
Marcar los orificios inferiores
Mark top edge of
template for next
hole alignment
Marcar el borde
superior de la plantilla
para la siguiente
alineación de orificios
Repeat last two
steps to add
additional holes
Repetir los últimos dos
pasos para agregar
orificios adicionales
Mark holes
Marcar los orificios
Move template up and align bottom edge with
the line made in the prior step mark holes
Desplazar la plantilla hacia arriba y alinear el borde
inferior con la línea trazada en el paso anterior al marcar
los orificios
Drill holes after marking
using preferred bit size
Taladrar los orificios luego de
marcarlos usando la broca del
tamaño preferido
S
X
WD
X
step 5
Base Cabinet
Gabinete de base
Pantry
Despensa
Align template against bottom panel
Alinear la plantilla con los paneles inferior
Align template against side panel
Alinear la plantilla con los paneles lateral
Mark bottom holes
Marcar los orificios inferiores
Mark top edge of
template for next
hole alignment
Marcar el borde
superior de la plantilla
para la siguiente
alineación de orificios
Repeat last two
steps to add
additional holes
Repetir los últimos dos
pasos para agregar
orificios adicionales
Mark holes
Marcar los orificios
Move template up and align bottom edge with
the line made in the prior step mark holes
Desplazar la plantilla hacia arriba y alinear el borde
inferior con la línea trazada en el paso anterior al marcar
los orificios
Drill holes after marking
using preferred bit size
Taladrar los orificios luego de
marcarlos usando la broca del
tamaño preferido
S