
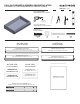
Installation Guide

10
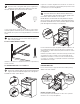
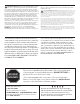
Prepare the cabinet glides by moving the ball bearing
cages to the front and pushing the rear of the glides
towards the center of the cabinet.
G (step 6)
PRESS UPWARD
APPUYEZ VERS LE HAUT / PRESIONA HACIA ARRIBA
PRESS DOWNWARD
APPUYEZ VERS LE BAS / PRESIONA HACIA ABAJO
PRESS DOWNWARD
PRESIONA HACIA ABAJO
PRESS UPWARD
PRESIONA HACIA ARRIBA
11
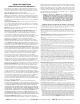
Insert the drawer box. Ensure that the drawer box
glide members slide through the plastic guide at the
front of the cabinet member on each side.
NOTE: Drawer should install smoothly but there may be
minor resistance when the drawer is approximately half to
two-thirds installed. This is normal, and the drawer should
push through this smoothly to seat properly.
Inserta el armazón del cajón. Asegúrate de que los elementos de
las correderas del armazón del cajón de deslicen a través de la
guía de plástico en ambos lados de la parte frontal de los elemen-
tos del gabinete.
NOTA: El cajón debe instalarse suavemente aunque puede existir
una pequeña resistencia cuando el cajón haya llegado aproxi-
madamente a la mitad o a los dos tercios de su instalación. Esto
es normal y el cajón debe ser empujado suavemente hasta llegar
adecuadamente a su lugar.
G (step 6)
PRESS UPWARD
APPUYEZ VERS LE HAUT / PRESIONA HACIA ARRIBA
PRESS DOWNWARD
APPUYEZ VERS LE BAS / PRESIONA HACIA ABAJO
PRESS DOWNWARD
PRESIONA HACIA ABAJO
PRESS UPWARD
PRESIONA HACIA ARRIBA
Prepara las correderas del gabinete moviendo las carcasas de los
rodamientos hacia adelante y empujando la parte posterior de las
correderas hacia el centro del gabinete.
DRAWER REMOVAL
Press release levers in opposite directions while pulling
drawer out of the cabinet.
EXTRACCIÓN DEL CAJÓN
Presiona las palancas de desbloqueo en direcciones opuestas
mientras se saca el cajón del gabinete.
G (step 6)
PRESS UPWARD
APPUYEZ VERS LE HAUT / PRESIONA HACIA ARRIBA
PRESS DOWNWARD
APPUYEZ VERS LE BAS / PRESIONA HACIA ABAJO
PRESS DOWNWARD
PRESIONA HACIA ABAJO
PRESS UPWARD
PRESIONA HACIA ARRIBA
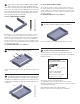
8
Place the front of the glides and spacers against the
cabinet face frame. Ensure the glides are level and
drill 1/8” diameter pilot holes into the face frame.
Coloca el frente de las correderas y espaciadores contra el marco
frontal del gabinete. Garantiza que las correderas queden nivela-
das y taladra orificios pilotos de 1/8 plg de diámetro en el armazón
frontal.
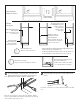
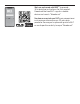
step 5
Base Cabinet
Gabinete de base
Pantry
Despensa
Align template against bottom panel
Alinear la plantilla con los paneles inferior
Align template against side panel
Alinear la plantilla con los paneles lateral
Mark bottom holes
Marcar los orificios inferiores
Mark top edge of
template for next
hole alignment
Marcar el borde
superior de la plantilla
para la siguiente
alineación de orificios
Repeat last two
steps to add
additional holes
Repetir los últimos dos
pasos para agregar
orificios adicionales
Mark holes
Marcar los orificios
Move template up and align bottom edge with
the line made in the prior step mark holes
Desplazar la plantilla hacia arriba y alinear el borde
inferior con la línea trazada en el paso anterior al marcar
los orificios
Drill holes after marking
using preferred bit size
Taladrar los orificios luego de
marcarlos usando la broca del
tamaño preferido
SP
9
Attach the glides to the face frame with the spacers
and screws provided.
DO NOT OVERTIGHTEN SCREWS
Instala las correderas en el armazón frontal con los espaciadores y
tornillos incluidos.
NO APRETAR DEMASIADO LOS TORNILLOS
step 5
Base Cabinet
Gabinete de base
Pantry
Despensa
Align template against bottom panel
Alinear la plantilla con los paneles inferior
Align template against side panel
Alinear la plantilla con los paneles lateral
Mark bottom holes
Marcar los orificios inferiores
Mark top edge of
template for next
hole alignment
Marcar el borde
superior de la plantilla
para la siguiente
alineación de orificios
Repeat last two
steps to add
additional holes
Repetir los últimos dos
pasos para agregar
orificios adicionales
Mark holes
Marcar los orificios
Move template up and align bottom edge with
the line made in the prior step mark holes
Desplazar la plantilla hacia arriba y alinear el borde
inferior con la línea trazada en el paso anterior al marcar
los orificios
Drill holes after marking
using preferred bit size
Taladrar los orificios luego de
marcarlos usando la broca del
tamaño preferido
R