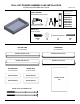
PULL-OUT DRAWER ASSEMBLY AND INSTALLATION INSTALACIÓN EXTRAIBLE DEL CAJÓN U180627/1218 Model Number(s): Numero(s) de: TOOLS NEEDED* HERRAMIENTAS NECESARIAS* KADRTA12 KADRTA15 KADRTA18 KADRTA21 KADRTA24 KADRTA27 KADRTA30 1/8" 3/8" *TOOLS NOT INCLUDED *HERRAMIENTAS NO INCLUIDAS PARTS LIST LISTA DE PIEZAS R14016 SP S7 WD 2X 2X 4X 4X OUTSIDE VIEW INSIDE VIEW LISTA DE PIEZAS LISTA DE PIEZAS DRAWER SIDE RIGHT (DSR) DRAWER SIDE RIGHT (DSR) DRAWER SIDE LEFT (DSL) OUTSIDE VIEW INSIDE VIEW LIST
1 I n this step you will need the (DSR), 2x (DE), 4x (WD) and 2x (S7) wood screws. Insert one (WD) into the lower holes on both ends of each (DE). Make sure the (DB) groove is on the inside, insert the (DE) dowel into the lower hole on the (DSR) and firmly press together, then insert the (S7) screw into the top hole of the (DSR) and screw in the (S7) screw. Repeat this for both (DE).
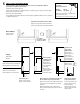
5 Hole Location and Drilling Guide TOOLS REQUIRED Use the template to mark all of the desired locations for holes, then drill with a 10mm bit (preferred) or 3/8” drill bit to drill your holes OUTILS REQUIS HERRAMIENTAS NECESARIAS Emplacement des trous et guide de perçage 10mm or 3/8" Drill Bit Utilisez le modèle pour marquer tous les emplacements de trous souhaités, puis percez à l’aide d’une mèche de 10 mm (préférée) ou de 3/8 po pour percer les trous.
6 Choose the upper or lower position of the pull-out drawer. Remove the plastic dowel and screw from each glide with pliers and screwdriver, and discard. Choisissez la position haute ou basse pour le tiroir à glissières. Retirez le goujon et la vis en plastique de chaque glissière avec des pinces et un tournevis et jetez-les. Seleccionar la posición superior o inferior del cajón extraíble Emplear alicates y destornillador para quitar la clavija plástica y tornillo de cada corredera; desechar una y otro.
G (step 6) 10 Prepare the cabinet glides by moving the ball bearing cages to the front and pushing the rear of the glides towards the center of the cabinet. Préparez les glissières de l’armoire en déplaçant les cages à roulement à billes vers l’avant et en poussant l’arrière des glissières vers le centre de l’armoire Preparar las correderas del gabinete moviendo las carcasas de los cojinetes de bolas hacia delante y empujando la parte posterior de las correderas hacia el centro del gabinete.
RSI HOME PRODUCTS, INC. LIMITED WARRANTY GARANTIE LIMITÉE DE RSI HOME PRODUCTS, INC./ GARANTÍA LIMITADA DE RSI HOME PRODUCTS, INC. What This Warranty Covers: RSI Home Products, Inc. ("RSI") warrants its parts and products to be free of substantial defects in materials and workmanship from the original date of purchase under normal home use. This warranty is offered only to the original consumer purchaser and may not be transferred.
Important health notice. Some of the building materials used in this home (or these building materials) emit formaldehyde. Eye, nose, and throat irritation, headache, nausea and a variety of asthma-like symptoms, including shortness of breath, have been reported as a result of formaldehyde exposure. Elderly persons and young children, as well as anyone with a history of asthma, allergies, or lung problems, may be at greater risk.