
Installation Guide


CABINET INSTALLATION
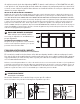
Select hardware that is best suited for your wall type
INSTALACIÓN DEL GABINETE
Selecciona los herrajes que mejor se adapten a tu tipo de pared
a
STUDS: Secure to wall with #10 x 3" screws at stud location.
VIGAS: Fíjalas a la pared con tornillos núm.10 x 3 plg (7.62 cm) en la ubicación
de las vigas.
b
DRYWALL: Drill holes and secure to the wall with toggle bolts. Note: Use
toggle bolts only when cabinet cannot be attached to a wall stud. Cabinet
must also be attached to adjacent cabinet as outlined in Step 3.
DRYWALL: Taladra orificios y asegura a la pared con pernos acodados. Nota: Usa
pernos acodados sólo si el gabinete no se puede fijar a la viga de pared. El gabinete
también debe asegurarse a otro gabinete adyacente, como lo indica el Paso 3.
c
CONCRETE: Drill ¼" holes, insert #10 wall anchors and secure to wall
with #10 x 3" screws.
CONCRETO: Taladra orificios de 1/4 plg 0.63 cm, inserta anclajes de pared Núm. 10
y fija a la pared con tornillos Núm. 10 x 3 plg (7.62 cm)
Important: Use “pan head” or “round head” screws with seat washers. Seat
screws tightly against back rail or panel without driving into back rail or pan-
el material.
Importante : usa tornillos de “cabeza plana biselada” o “cabeza redonda” con aran-
delas de asiento. Coloca los tornillos firmemente contra el panel o el riel trasero sin
insertarlos en el panel o el riel
1
STARTING IN A CORNER
Always start in a corner where two runs of cabinets will come together or at the end of the
cabinet run (if there is no corner.) All doors and drawers will need to be removed prior to installation.
Locate and mark wall studs for mounting hardware placement. Cabinets must be mounted to studs
where available. Place the cabinet into position, use a level and shims (if needed) to ensure cabinet is
level and plumb. IMPORTANT: Shim cabinets square (flat) to the wall so there are no gaps between
back of cabinet and wall in the mounting area. Drill a 3/16” pilot hole at the stud locations through the
back panel and into the stud. Make sure to position screws 1” or more from the top, bottom and sides.
Mount the cabinet to the wall with hardware appropriate for your wall type. Once your corner cabinets
have been installed, work outward to install the remaining cabinets.
EMPEZANDO EN UNA ESQUINA
Siempre empezar por la esquina donde se unen dos hileras de gabinetes. Durante la instalación es necesario
quitar todas las puertas para alinear correctamente todos los gabinetes al unirlos. Localizar y marcar las vigas
de pared elegidas para instalar los gabinetes. Colocar el gabinete de la esquina en ese lugar. Usa el nivel para
garantizar que el gabinete quede nivelado y derecho. Si es necesario usa cuñas para nivelar. IMPORTANTE: Usa
cuñas en los gabinetes para que queden a escuadra (pegados) con la pared sin dejar espacios entre el fondo
del gabinete y la pared en el área de montaje. Taladra un orificio piloto de 4,76 mm donde está la viga, a través
del panel trasero y dentro de la misma. Asegúrese de colocar los tornillos a 2.54 cm o más de la parte superior,
a
b
c
INSTALLATION INSTRUCTIONS
INSTRUCCIONES DE INSTALACIÓN
U180740 | 5-22