
Installation Guide

Before installing the long panel (84", 90" or 96"), next to the bridge cabinet, add cleats. This will help keep the end
panel straight along its entire length, preventing bowing and instability. Cleats can be created from plywood. Ensure
they are the correct depth/length/width. While still on the ground, add cleats to the joined panel /back of 84" panel
by itself, to create an assembled piece. To install the long end panel, check beforehand that the oor and wall are
level. Place the end panel into position. Also check the dimensions of your refrigerator to ensure a good t.
Antes de instalar el panel largo (213.4 cm, 228.6 cm o 243.8 cm) próximo al gabinete de unión, coloca listones. Esto ayudará a que el panel de extremo
se mantenga recto a todo lo largo, evitando cualquier inclinación e inestabilidad. Los listones pueden elaborarse con plywood. Asegúrate de que
tengan la profundidad, largo y ancho adecuados. Mientras todavía está en el suelo, añade listones al panel unido/parte posterior del panel de 213.4
cm por sí mismo, para crear una pieza ensamblada. Para instalar el panel de extremo largo, comprueba antes que el piso y la pared estén nivelados.
Coloca el gabinete de extremo en posición. Verica también las dimensiones del refrigerador para garantizar un ajuste adecuado.
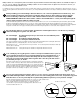
Now install the whole assembly. To connect the bridge cabinet with the end
panel, start by going through the inside of the bridge cabinet, screwing through
the face frame (of cabinet) in the front (2 1/2" phillips screws, not included),
through the cleats, and all the way into the wood edge of the long panel. Drill
screws through the side panel of the cabinet as well, anchoring through the
plywood piece to the long panel. Do this in the back, as well. BE CAREFUL NOT
TO SCREW ALL THE WAY THROUGH THE SIDES OF YOUR END PANEL, AS
THIS WILL BE VISIBLE AFTER INSTALLATION!
Ahora instala todo el ensamblaje. Para conectar el gabinete de unión con el panel de extremo, comienza
por el interior del gabinete atornillando (tornillos Phillips
de 2 1/2 plg, no incluidos) a través del armazón frontal (del
gabinete) del frente y de los listones hasta el interior del
borde de madera del panel largo. Inserta también tornillos
a través del panel lateral del gabinete, anclándolo a través
de la pieza de plywood al panel largo. Haz también esto
en la parte posterior. ¡TEN CUIDADO DE NO ATORNILLAR
COMPLETAMENTE A TRAVÉS DE LOS LATERALES
DEL PANEL DE EXTREMO, PUES ESTO SERÁ VISIBLE
DESPUÉS DE LA INSTALACIÓN
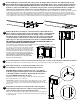
Secure the long panel to the oor in the front and the back. Use a screw to anchor the front of the panel to the oor.
Asegura el panel largo al piso en las partes frontal y posterior. Usa un tornillo para anclar la parte frontal del panel al piso.
Then, using L brackets, as shown (not included), and screws
(not included), secure the panel to the back wall, as shown.
CAUTION: When installing a panel that has a 6" or 12" addition,
both the long (84") and short panels need to be individually afxed
to the bridge cabinet, to the frame. Even though the two panels
are joined, NEVER afx just the 84" panel.
Enseguida usa soportes en L (no incluidos) y tornillos (no incluidos) para asegurar el
panel a la pared posterior, como se muestra.
PRECAUCIÓN: Al instalar un panel que tiene un panel adicional de 15.2 cm o de 30.5
cm, tanto el panel largo como el corto deben jarse individualmente al gabinete de
unión y al marco. Aunque los dos paneles estén unidos, NUNCA jes tan solo el panel
de 213.4 cm.
Repeat this in several places along the inside of the long panel,
using L brackets and #10 x 2 1/2" cabinet screws (not included) to
anchor the back of the panel to the studs in the wall.
Repite esto en varios lugares a lo largo del interior del panel largo, usando soportes en
L y tornillos núm. 10 x 2 1/2 plg (no incluidos) para anclar la parte posterior del panel a
las vigas de la pared.
6
7
8
9
A
A
5
Step 8
Step 7