
Instructions / Assembly

inferior y laterales. Asegúrese de colocar los tornillos a 2.54 cm o más de la parte superior, inferior y laterales.
Monta el gabinete en la pared con el herraje correcto según el tipo de pared. Después de instalar los gabinetes
de la esquina, prosigue con los demás.
2
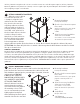
ATTACH CABINETS TOGETHER
After the corner cabinet
is secured to the wall, use
c-clamps to align the next
cabinet to the first cabinet.
Use a level to be sure the
adjoining cabinets are flush
and level with each other. If
needed, shim the cabinets to
level. Drill a 1/8” pilot hole in
the face frame above or below
each door hinge location.
Attach the second cabinet to
the first cabinet using a #8 x
2½” screw and countersink
for best appearance. Always
attach cabinets together at the face frame as shown. Do not attach through the cabinet side panel.
ATTENTION: You must drill pilot holes to attach cabinets together. Cabinet drawers and doors should
line up as shown below.
UNIR LOS GABINETES
Después de fijar el gabinete de la esquina a la pared, usa abrazaderas en “C” para alinear el gabinete siguiente
al primero. Usa un nivel para garantizar que los gabinetes contiguos queden a ras y a nivel entre sí. Si es
necesario, usa cuñas para nivelar. Taladra un orificio piloto de 1/8” en el marco frontal arriba y debajo del lugar
donde irán las bisagras de las puertas. Sujeta el segundo gabinete al primero con un tornillo núm. 8 de 2 1/2 plg
(6.35 cm) e instala al ras para darle un mejor aspecto. Siempre une los gabinetes por el marco frontal como se
muestra. Nunca fijes los gabinetes por el panel lateral. ATENCIÓN: Debes taladrar orificios piloto para unir los
gabinetes.
3
INSTALL REMAINING CABINETS
Drill a 3/16” pilot hole at the stud locations through the back
panel and into the stud. Level and mount the cabinet to the wall
with hardware appropriate for your wall type. If needed, shim the
cabinet to level. DO NOT
COMPLETELY TIGHTEN
MOUNTING SCREWS UNTIL
ALL CABINETS HAVE BEEN
ATTACHED TOGETHER.
After all cabinets have been
attached together and are
level and secure, then tighten
all mounting screws. Take
care to seat mounting screws
tightly against back panel
without driving into back panel
material. Check to be sure that
b
a
c
2
a
Mounting hardware
Herrajes de Montaje
b
Check to level & ensure square
flat to wall
Verifica la nivelación y que quede
pegado contra la pared a es-
cuadra
c
Shim if necessary, installation
shims are not included
Usa cuñas si es necesario. Cuñas
de instalación (No Incluidas)
d
e
c
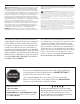
3
a
Mounting hardware
Herrajes de Montaje
b
Check to level & ensure square
flat to wall
Verifica la nivelación y que quede
pegado contra la pared a es-
cuadra.
c
Shim if necessary, installation
shims are not included
Usa cuñas si es necesario.
Cuñas de instalación (No Inclui-
das)
d
Scrap Block
Bloque de Recorte
e
1/8” Diameter
1/8 PLG (3.18 MM) DE DIÁM.