
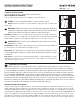
Instructions / Assembly


all cabinets remain level after tightening. NOTE: To attach a wall cabinet to a TALL PANTRY unit, drill
a 1/8” pilot hole 7/8” deep through the wall cabinet face frame to the tall pantry unit. Use a #8 x 1-5/8”
screw to secure cabinets together. After cabinets are installed it will be necessary to adjust doors and
drawers for proper alignment.
INSTALAR EL RESTO DE LOS GABINETES
Taladra un orificio piloto de 3/16 plg donde está la viga, a través del panel trasero y dentro de la misma. Level
and mount the cabinet to the wall with hardware appropriate for your wall type. If needed, shim the cabinet to
level. NO APRIETES POR COMPLETO LOS TORNILLOS DE MONTAJE HASTA QUE LOS GABINETES ESTÉN
UNIDOS. Aprieta todos los tornillos de montaje después que todos los gabinetes hayan sido unidos firmemente
y estén a nivel. Asegúrate de que los tonillos de montaje descansen firmemente contra el posterior panel sin
que perforen el material de estos. Verifica que todos los gabinetes queden a nivel después de apretados los
tornillos. NOTA : Para fijar un gabinete de pared a una DESPENSA ALTA, taladra un orificio piloto de 1/8 plg con
una profundidad de 7/8 plg a través del marco frontal del gabinete de pared a la despensa alta. Usa un tornillo
núm. 8 x 1-5/8 plg para fijar los gabinetes.
4
DOOR AND DRAWER ALIGNMENT
After cabinets are installed it will be
necessary to adjust doors and drawers for
proper alignment.
ALINEACIÓN DE PUERTA Y CAJÓN
Después de que los gabinetes estén instalados,
será necesario ajustar las puertas y los cajones
para una alineación adecuada.
FINISHING UNFINISHED CABINETS
CÓMO DAR ACABADO A GABINETES SIN ACABADO
Fill screw holes made in the face frame stiles with wood putty. Sand the cabinets and prep for stain.
Use a tack cloth to thoroughly wipe the surface and remove any excess dust. A surface that is improp-
erly prepared will not stain correctly. Stain or paint your cabinets according to the finish manufactur-
er’s recommended instructions.
Rellena con masilla para madera los orificios de tornillos hechos en los travesaños del marco. Lija los gabinetes
y prepáralos para el tinte. Usa un paño adherente para limpiar bien la superficie y remover cualquier exceso de
polvo. Una superficie que no se prepare adecuadamente no absorberá el tinte correctamente. Tiñe o pinta tus
gabinetes según las instrucciones recomendadas por el fabricante para el acabado.
5
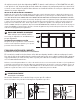
HINGE ADJUSTMENT
AJUSTE DE LA BISAGRA
Review the illustrations to locate the hinge on your specific cabinet.
Revise las ilustraciones para ubicar la bisagra en su gabinete específico.
4
Up/Down
Arriba/Abajo
Up/Down
Arriba/Abajo
In/Out
Adentro/Afuera
Left/Right
Izquierda/Derecha
In/Out
Adentro/Afuera
Left/Right
Izquierda/Derecha
Up/Down
Arriba/Abajo