
Installation Guide

Each installer must evaluate the specic characteristics of the particular wall on which the cabinets are to be installed to ensure the proper fastening solution
is used and the product is fastened safely and securely. This may require hardware or fastening methods which are different from, or in addition to, this general
outline. RSI does not warrant the installation of this product.
Cada instalador tiene que evaluar las características especícas de la pared especíca en que se instalarán los gabinetes para garantizar que la solución de
sujeción sea apropiada y que el producto quede sujeto segura y rmemente. Esto podría requerir herrajes o métodos de sujeción diferentes o adicionales a los
descritos aquí. RSI no garantiza la instalación de este producto.
Algunos hornos pudieran ser más chiquitos aún que el actual vano de tamaño mínimo; de ser así, están disponibles para cada acabado rellenos de 3" y 6" de
altura (7.62 y 15.2 cm) que se compran por separado.
* Estas son solo sugerencias. Estructura de soporte para el horno se puede hacer de varias maneras
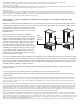
Install overhead Deep Bridge Cabinet:
To Install the overhead Deep Bridge Cabinet, follow instructions for installing wall cabinets (included in Bridge Cabinet packaging),
as in Fig. 4. The 12" H and 18" H bridges are installed directly on top of the Oven Cabinet, and are screwed in from the face frame
of the Deep Bridge Cabinet to the oven frame, along the back, side and top. Anchor the bridge to the studs in the wall, as well.
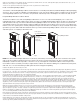
Deep Wall Bridge With 96" H cabinet ordered:
The 96" Oven Cabinet comes with a Deep Bridge Cabinet that is 23 1/2" H. In order to lift the bridge by 1/2" to reach a 24"
required height, there is a ller, called a Frame spacer (as in Fig. 5), included with this bridge cabinet only that goes along the front
and sides between the top of the Oven Cabinet and the Deep Bridge Cabinet. This side frame spacer ensures we reach the full
overall height of 96" H for the entire cabinet. Start by installing the side frame spacer directly to the top of the oven cabinet. Note
that this comes in 3 separate pieces. Start by nailing the front piece into the frame. The side pieces are grooved and can be lined
up with the top of the cabinet and then nailed in from the top. Then install the Deep Bridge Cabinet so that it rests on top of the
side frame spacer, so everything is ush at the front.
NOTE: It is critical that the bridge cabinet isn’t mounted only at the back (to wall studs). It needs to be mounted on the top side
walls of the Oven Cabinet, and thru their front face frames; this means securely anchoring the two pieces together, and both
individually to studs in the wall; if possible, connect these to any other adjacent overhead wall cabinets. The lower part of the
Oven Cabinet can be secured by connecting to adjacent base cabinets.
TIP: Whenever drilling into a cabinet frame, back panel,
wall cleat, etc., it is recommended to pre-drill a pilot hole rst to help prevent splitting.
Instalación del gabinete de unión hondo por encima:
Para instalar por encima el gabinete de unión hondo, sigue las instrucciones de instalación de instalaciones de pare (incluidas paquete del gabinete de puente).
Las uniones de 12" y 18" (30.5 y 45.7 cm) de altura se instalan directamente sobre la parte superior del gabinete para horno, atornillándose desde el marco frontal
del gabinete de unión hondo al marco del horno a lo largo de las partes posterior, lateral y superior. Así mismo ancla el separador a las vigas en la pared.
Unión honda de pared con gabinete de 96" (2.44 m) de altura ordenada:
El gabinete de 96" (2.44 m) para horno viene con un gabinete de unión hondo de 23 ½" (60 cm) de altura. Para levantar la unión ½” y alcanzar la altura requerida
de 24" (61 cm) hay un relleno denominado espaciador lateral de marco, incluido solo con este gabinete de unión, que corre por el frente y los laterales entre
la parte superior del gabinete para horno y el gabinete de unión hondo. Este espaciador lateral de marco garantiza que alcancemos la altura general de 96"
(2.44 m) para todo el gabinete. Comienza instalando el espaciador lateral de marco directamente sobre la parte superior del gabinete para horno. Ten en cuenta
que viene en tres piezas separadas. Comienza clavando la pieza frontal al marco. Las piezas laterales están ranuradas y pueden alinearse con la parte superior
del gabinete y entonces clavarse desde la parte superior .Enseguida instala el gabinete de unión hondo de manera que descanse sobre la parte superior del
espaciador lateral de marco para que todo quede a ras por el frente.
NOTA: Es esencial que el gabinete de unión no se monte solo por la parte posterior (a vigas de pared). Es necesario montarlo sobre las paredes laterales
superiores del gabinete para horno y a través de sus marcos frontales; esto implica anclar con seguridad las dos piezas juntas, y ambas individualmente a las
vigas en la pared; si es posible, conéctalas a cualquier otro gabinete de pared encimero adyacente. La parte inferior del gabinete para horno puede asegurarse
también conectándola a los gabinetes de base adyacentes.
CONSEJO: Siempre que se taladre en un armazón de gabinete, panel posterior, listón de pared,
etc., se recomienda pretaladrar un oricio piloto para evitar astilladuras.
OVEN CABINET W/BRIDGE
Fig. 4
Frame spacer
96" H Oven Cabinet only
Fig. 5
Deep Bridge Cabinet
(Comes in
three pieces)
(Viene en
tres piezas)