
Instructions / Assembly
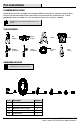
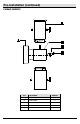
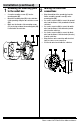
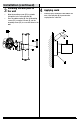

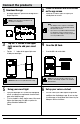
Table Of Contents
- CONTENIDO DEL
- WHAT IS COVERED
- WHAT IS NOT COVERED
- Pre-Installation
- Planning Installation
- Tools Required
- Hardware included
- Pre-Installation (continued)
- Package Contents
- LO QUE ESTA CUBIERTO
- LO QUE (NO) ESTA CUBIERTO
- Pre-Instalatión
- PLANIFICACIÓN DE LA INSTALACIÓN
- HERRAMIENTAS NECESARIAS
- HARDWARE includio
- Pre-Instalación (continuación)
- CONTENIDO DEL PAQUETE
- CE QUI EST COUVERT
- CE QUI EST COUVERT (ET PAS)
- Pré-Installation
- PLANIFICATION DE L'INSTALLATION
- OUTILS REQUIS
- MATERIEL inclus
- Pré-Installation (suite)
- CONTENU DE L'EMBALLAG

6
Installation (continued)
3
Securing the wall plate to
the wall
4
Applying caulk
□ Align the mounting screws (CC) to protrude
through the holes on the wall plate (A).
□ Place the rubber washer (D) over the mounting
screws (CC), screw the lock nuts (E) onto the
mounting screws (CC)
to secure the fixture to the
wall.
□ Caulk the space between the wall and the full
area of the wall plate (A) to prevent water
seeping into the outlet box.