
Installation Guide


STEP 4: INSTALL BASE CABINETS
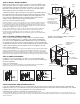
When/if your design meets a corner, it is best to start the installation from
that point. If the wall is not straight or plumb, you may need to use a ller
(sold separately); transfer the wall shape to the ller so you can cut the
ller ush to the wall. Fillers may also be used to accommodate wall to
wall installations where the cabinets do not t exactly.
Set the rst cabinet in place and shim it to the previously established level
line. Drill pilot holes at the stud location, through the back panel and into
the studs. Then securely fasten the cabinet to the wall, using #8 X 2-1/2
inch screws and appropriate anchors (DO NOT NAIL). Make sure the
cabinet remains square and level after wall attachment.
PASO 4: INSTALAR LOS GABINETES DE BASE
Cuando/Si tu diseño coincide con una esquina, es mejor comenzar la instalación desde ese
punto. Si la pared no está recta o nivelada, tal vez necesites usar un separador (se vende
por separado) y transferir la forma de la pared al separador para poder recortarlo al ras con
la pared. Los separadores pueden usarse también para adaptar las instalaciones de pared a
pared donde los gabinetes no ajusten con exactitud.
Coloca el primer gabinete en su lugar y cálzalo a la línea a nivel previamente establecida.
Taladra oricios pilotos donde está la viga, a través del riel posterior y dentro de ella.
Enseguida asegura el gabinete a la pared con tornillos núm. 8 de 2/12 pulgadas y los
anclajes apropiados (NO CLAVAR). Verica que el gabinete quede recto y nivelado después
de jarlo a la pared.
STEP 5: ATTACH CABINETS TOGETHER
Once you have securely fastened the starting cabinet to the wall, line up the
front of the next cabinet and use “C” Clamps to join together. Now drill a pilot
hole using a 1/8" inch drill bit through the adjoining stiles. Once done, draw the
two together, use two #8 X 2-inch wood screws (gure 1). Continue installing the
remaining base cabinets in the same manner. After joining all of your base cabinets
together, verify all cabinets are level; and then secure each cabinet to the wall.
PASO 5: UNIR LOS GABINETES
Una vez que hayas instalado de forma segura el primer gabinete a la pared, alinea la parte frontal del
siguiente y usa las abrazaderas en “C” para unirlos. Ahora taladra un oricio piloto, con una broca
de taladro de 1/8 plg, en los montantes adyacentes. Una vez hecho esto, únelos usando tornillos
para madera núm. 8 de 2 plg (Fig. 1). Continúa instalando los gabinetes restantes de la misma manera.
Después de unir todos tus gabinetes de base, verica que estén nivelados y asegura cada uno a la pared.
STEP 6: HINGE ADJUSTMENT
It usually is necessary to adjust your hinges once you have nished the
installation of your cabinets (gure 2). You must do this before installing any
decorative hardware.
PASO 6: AJUSTE DE BISAGRA
Usualmente es necesario ajustar las bisagras una vez terminada la instalación de tus gabinetes
(Figura 2). Tienes que hacer esto antes de instalar cualquier herraje decorativo.
VANITY SINK BOWL AND DRAWER CONFLICT
If you are combining cabinets using a 12" drawer base, there may be instances where the vanity bowl will conict with the
top drawer. In this case, you will need to remove the top drawer front from the drawer box and mount it directly to the cabinet.
It will also be necessary to cut the side panels to accommodate the sink.
INTERFERENCIA DEL TAZÓN DEL LAVAMANOS DEL TOCADOR CON EL CAJÓN
Si estás combinando gabinetes con una base de cajón de 30.5 cm, puede que en ocasiones el tazón del tocador interera con el cajón superior. En este caso
necesitarás quitar la parte frontal superior del cajón de madera e instalarla directamente en el gabinete. También será necesario cortar los paneles laterales para
ajustar el lavamanos.
Installation spacer
Separador de
instalación
Stiles
Montantes
1/8 in. diameter
3.2 mm de diámetro
Scrap blocks
Bloques de recorte
FIGURE 1
FIGURE 2
Shims
Cuñas
Shims / Cuñas
Wall / Pared
3" Filler. Trim to desired
size and shape
Separador de 7.6 cm
Recorta en la forma y
con el tamaño deseados
Block
Bloque
Block / Bloque
Wall
Pared
Filler
Separador
Toe kick not included, but available separately in
all nishes. Ask for KATKX.