
Installation Guide

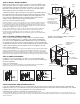

REMOVING THE DRAWER FROM THE CABINET
To remove the drawer entirely from the cabinet, extend the drawer to the outer most location (pull
out as far as it will go). Press release levers in opposite directions while pulling drawer out of the
cabinet. The drawer will now be ready to be removed. Lift the drawer away. Place the drawer with
drawer bottom down, on a solid surface.
CÓMO QUITAR EL CAJÓN DEL GABINETE
Para quitar por completo el cajón del gabinete, saca el cajón tan afuera como sea posible (hálalo hasta donde llegue).
Presiona las palancas de desbloqueo en direcciones opuestas mientras sacas el cajón del gabinete. El cajón estará
listo para ser quitado. Levanta y saca el cajón. Coloca el cajón, con su parte inferior hacia abajo, sobre una supercie
sólida.
REMOVING THE DRAWER FRONT ATTACHED TO DRAWER ITSELF
Using a rubber mallet, tap the drawer front off of the drawer, by tapping to the underside of
the drawer face, so as not to damage the front facing piece. Use 3 or 4 good taps to loosen
the drawer from the sides of the drawer box; please use moderation. Once the
drawer is loosened, remove any staples or tap in place so sharp ends aren’t
protruding.
Reattach the drawer front onto the cabinet. You can discard the disassembled
drawer pieces. Locate the small parts bag, with 4 “L” brackets and 8 screws.
These will be used to reattach the drawer front.
CÓMO QUITAR LA PARTE FRONTAL DEL CAJÓN ENGANCHADA A ESTE
Con un mazo de goma, golpea la parte frontal del cajón, por el fondo de la cara, para no dañar la
pieza que mira al frente. Golpea 3 o 4 veces para liberar el cajón de los lados del compartimiento del
cajón; hazlo con moderación. Una vez que el cajón esté suelto, quita cualquier grapa o golpea en el
lugar para que no sobresalga ningún extremo alado.
Vuelve a instalar la parte frontal del cajón en el gabinete. Puedes desechar las partes desarmadas
del cajón. Localiza la pequeña bolsa de piezas, con 4 soportes en forma de “L” y 8 tornillos. Estos se
usarán para volver a jar la parte frontal del cajón.
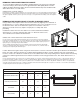
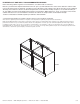
Position drawer front against frame using chart shown below to center it on the frame and line up the drawer front with drawers
below; the chart is based on nish/style of cabinet. Mark equidistant locations on back of drawer front and corresponding
locations on frame for L brackets. Pre-drill 4 holes in the cabinet frame. Drill corresponding holes in back of drawer front, being
careful not to drill through the drawer front. Attach L brackets to frame using provided screws; then attach drawer front to L
bracket.
Coloca la parte frontal del cajón contra el marco usando la tabla que se muestra a continuaciónpara centrar aquel en el marco y alinear la parte frontal con
los cajones más abajo; el gráco se basa en el acabo y estilo del gabinete. Marca posiciones equidistantes en la parte posterior del frente del cajón y las
posiciones correspondientes en el marco para los sujetadores en L. Pre-taladra 4 oricios en el marco del gabinete. Taladra los oricios correspondientes
en la parte posterior del frente del cajón y cuida de no taladrar a través de dicho frente.Engancha los soportes en L al marco con los tornillos suministrados;
enseguida engancha el frente del cajón a los soportes en L.
X X
Y
DRAWER REVEALS
FINISH
X (millimeters) X (inches) Y (millimeters) Y (inches)
MO (RAISED PANEL)
25.4 1 31.2
1 1/4
COG (RAISED PANEL)
25.4 1 31.2
1 1/4
SW (WHITE)
6.4
1/4
6.4
1/4
SJM (SHAKER)
6.4
1/4
6.4
1/4
DRAWER REVEALS / DRAWER REVEALS / DRAWER REVEALS
FINISH / FINISH / FINISH X (millimeters) X (inches) Y (millimeters) Y (inches)
MEDIUM OAK (RAISED PANEL) 25.4 1 31.2 1 1/4
COGNAC (RAISED PANEL) 25.4 1 31.2 1 1/4
SATIN WHITE 6.4 1/4 6.4 1/4
JAVA (SHAKER) 6.4 1/4 6.4 1/4