
Installation Guide


INSTALLATION INSTRUCTIONS
INSTRUCCIONES PARA LA INSTALACION
STEP 1: CABINET INSTALLATION. SELECT HARDWARE THAT IS BEST SUITED FOR YOUR WALL TYPE
IMPORTANT: USE “PAN HEAD” OR “ROUND HEAD” SCREWS WITH SEAT WASHERS. SEAT SCREWS TIGHTLY AGAINST
BACK RAIL OR PANEL WITHOUT DRIVING INTO BACK RAIL OR PANEL MATERIAL.
PASO 1: INSTALACION DE GABINETES. SELECCIONE LA HERRAJERIA QUE MAS SE ADECUA AL TIPO DE SU PARED.*
IMPORTANTE: USA TORNILLOS DE “CABEZA PLANA BISELADA" O “CABEZA REDONDA" CON ARANDELAS DE ASIENTO. COLOCA LOS TORNILLOS
FIRMEMENTE CONTRA EL PANEL O EL RIEL TRASERO SIN INSERTARLOS EN EL PANEL O EL RIEL.
INSTALLATION INSTRUCTIONS • INSTRUCCIONES PARA LA INSTALACION
U180429/0217
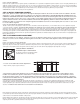
STUDS:
Secure to wall with
#10 x 3" screws at
stud location.
MONTANTES: Fíjelo a
la pared con tornillos de
# 10 x 3 pulgadas en los
montantes.
DRYWALL:
Drill holes and secure to the
wall with toggle bolts.
Note: Use toggle bolts only
when cabinet cannot be
attached to a wall stud.
Cabinet must also be attached to adjacent
cabinet as outlined in Step 3.
PANEL DE YESO: Taladre los oricios y je la unidad
a la pared conpernos acodillados. Nota: Use pernos
acodillados sólo cuando el gabinete no se pueda jar
a los montantes de pared. El gabinete también se
debe jar al gabinete adyacente como se indica en el
paso 3.
CONCRETE:
Drill ¼" holes, insert
#10 wall anchors and
secure to wall with
#10 x 3" screws.
CONCRETO: Taladre
oricios de ¼ pulgada, inserte anclas de
expansión de #10 y fíjelo a la pared con tornillos
de # 10 x 3 pulgadass.
STEP 2: CABINET INSTALLATION - A NOTE ABOUT INSTALLING DEEP WALL BRIDGES:
These kinds of cabinets must be anchored in the back to studs in the wall due to their depth & weight- always anchor to walls
and cabinets on both sides in addition to the studs in the wall. Never hang cabinet by itself. Cabinet can fail if not anchored
properly.
STARTING IN A CORNER
Always start in a corner where two runs of cabinets will come together. All doors will need to be removed during the installation
process to properly align all cabinets together. Locate and mark wall studs where planned cabinets are to be installed. Place
the corner cabinet into that position. Use a level to be sure that the cabinet is level and straight. If needed, shim the cabinet
to level. IMPORTANT: Shim cabinets square (at) to the wall so there are no gaps between back of cabinet and wall in the
mounting area. Drill a 3/16" pilot hole at the stud locations through the back panel and into the stud. Mount the cabinet to the
wall with hardware appropriate for your wall type. Once your corner cabinets have been installed, work outward to install the
remaining cabinets.
PASO 2: INSTALACIÓN DEL GABINETE – EMPEZAR POR UNA ESQUINA
Siempre empezar por la esquina donde se unen dos hileras de gabinetes. Durante la
instalación es necesario quitar todas las puertas para alinear correctamente todos los
gabinetes al unirlos. Localizar y marcar las vigas de la pared elegidas para instalar los
gabinetes. Colocar el gabinete de la esquina en ese lugar. Usa el nivel para garantizar que el
gabinete quede nivelado y derecho. Si es necesario usa cuñas para nivelar. IMPORTANTE:
Usa cuñas en los gabinetes para que queden a escuadra (pegado) con la pared sin dejar
espacios entre el fondo del gabinete y la pared en el área de montaje. Taladra un oricio
piloto de 4,76 mm donde está la viga, a través del panel trasero y dentro de la misma. Monta
el gabinete en la pared con el herraje correcto según el tipo de pared. Después de instalar los
gabinetes de la esquina, prosigue con los demás.
STEP 3: ATTACH CABINETS TOGETHER
After the corner cabinet is secured to the wall, use C-clamps to align
the next cabinet to the rst cabinet. Use a level to be sure the adjoining
cabinets are ush and level with each other. If needed, shim the cabinets to level. Drill a 1/8" pilot hole in the face frame above
or below each door hinge location. Attach the second cabinet to the rst cabinet using a #8 x 2½" screw and countersink for
best appearance. Always attach cabinets together at the face frame as shown. Do not attach through the cabinet side panel.
ATTENTION: You must drill pilot holes to attach cabinets together.
Mounting Hardware
Herrajes de Montaje
Check to level &
ensure square at
to wall
Verica la nivelación y que
quede pegado contra la
pared a escuadra
Shim if necessary
Usa cuñas si es necesario