
Installation Guide


6
Assembly (continued)
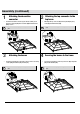
1
Attaching the decorative
connector
2
Attaching the top connector to the
top beam
□ Insert the decorative connector (L) into the decorative groove
(D1) and corner part (D2). Then use bolts (AA) and flat washers
(BB) to secure.
NOTE: To avoid destroying the finish, please handle it with
care.
□ Attaching the top connector (N1) to the top beam (N2) using
screw (CC) and flat washers (BB).
NOTE: To avoid destroying the finish, please handle it with
care
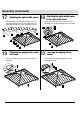
3
Attaching the beams
4
Securing the beams to the frame
□ Insert the long beam (F) to the beam connector and secure using
screws (DD), flat washers (BB) and nuts (EE).
NOTE: To avoid destroying the finish, please handle it with
care.
□ Secure the long beams (F) to the top connectors (N1) using bolts
(AA) and flat washers (BB).
NOTE: To avoid destroying the finish, please handle it with
care.