
User Guide


8
Installation - New Construction (continued)
7
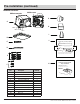
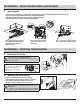
Install the grille
Attach the grille by squeezing one spring together and inserting the springs into the spring guides in the fan housing (A).
Connect male and female terminals from the wire cover(AA) and grille(B).
Then insert the other spring and push the grille (B) up against the ceiling.
Check that the installation is secure and safe from falling objects.
Step 1- Attach the grille by squeezing
one spring together and inserting the
springs into the spring guides in
the fan housing (A)
Step 3 - Then insert the other spring and
push the grille (B) up against the ceiling
Step 2- Connect male and female
terminals from wire cover (AA)
and grille (B)
Installation - Existing Construction
1
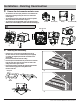
Remove the existing fan
Remove the old fan from the ceiling.
CAUTION: Make sure power is switched off at
service panel before starting installation.
Wear gloves during installing to help protect your
hands from injury.
1
1
1
0
9
8
7
6
5
4
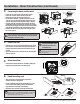
10 5/8inch
10 5/8inch
2
Measuring the ceiling opening
Measure the opening to ensure it is large enough to
accommodate the new fan body (A) (10 5/8 in. x 10 5/8 in.).
If this fan is not replacing an old fan, be sure to cut a
10 5/8 in. x 10 5/8 in. opening for the fan body (A).
NOTE: Wear safety goggles to prevent getting dust,
falling insulation or other debris into your eyes, nose
and mouth.
Carefully cut open the ceiling hole with out cutting into
electrical or gas or water lines that may not be visible.
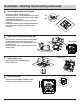
Please remove the tape, which protects
the damper during shipping and
installation, from the duct adaptor as
shown below.
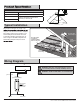
IMPORTANT: