Item #317297137 Model #LDS-BF3001 USE AND CARE GUIDE LED VENTILATION FAN Questions, problems, missing parts? Before returning to the store, call Hampton Bay Customer Service 8 a.m. - 7 p.m., EST, Monday-Friday, 9 a.m. - 6 p.m., EST, Saturday 1-800-841-1350 HAMPTONBAY.COM THANK YOU We appreciate the trust and confidence you have placed in Hampton Bay through the purchase of this ventilating bath fan. We strive to continually create quality products designed to enhance your home.
Table of Contents Table of Contents ........................................................... 2 Safety Information .......................................................... 2 ................................................... 4 Typical Installation.......................................................... 4 Wiring Diagram ............................................................... 4 Warranty .......................................................................... 5 LIMITED LIFETIME WARRANTY ......
Safety Information FCC Part 15Supplier's Declaration of Conformity Product Description : Bathroom Exhaust Fan with LED Light Model Number :LDS-BF3001 Trade Name:HAMPTON BAY Responsible Party :300 Technology Court SE Suite 100, Smyrna, GA 30082 Tel.: (678) 293-8382 Testing Laboratory : Intertek Testing Services Shanghai Building No.86, 1198 Qinzhou Road (North), Caohejing Development Zone, Shanghai 200233, China This device complies with part 15 of the FCC Rules.
SPECIFICATIONS Airflow: 160 CFM Main light: 1500lm Night light: 2200K SPECIFICATIONS Power consumption: Fan 38W, Light 20W Voltage: 120 V, 60 Hz Weight: 13.45 lbs. Duct diameter: 6 in. Ceiling Opening Dimension Requirements: 12.17 in. (L) x 11 in. (W). Sound output: 1.1 Sones Typical Installation The ducting from this fan to the outside of the energy use of the fan.
Warranty LIMITED LIFETIME WARRANTY WHAT IS COVERED 3 of charge, postage-paid at their option. This warranty does not cover products that have been abused, altered, damaged, misused, cut or worn. This warranty does not cover use in commercial applications. Use only manufacturer-supplied genuine warranty repair replacement parts to repair this fan. Use of non-genuine repair parts will void your warranty.
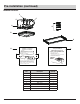
Pre-installation (continued) PACKAGE CONTENTS F C E A D B G H Drywall Cutout Template Easy installation Gabarit de découpe pour cloison sèche Installation facile Fan Housing Covering Template Gabarit de recouvrement du boîtier du ventilateur Caution/Attention: Grille enclosed – Do not throw away Installation instructions are included within the grille’s packaging Grille fermée - Ne pas jeter Les instructions d'installation sont incluses dans l'emballage de la grille.
Installation - New Construction with Flex Bracket CAUTION: Make sure power is switched off at service panel before starting installation. Wear gloves during installing to help protect your hands from injury. NOTE: Ceiling mount only. IMPORTANT: Please remove the tape, which protects the damper during shipping and installation, from the duct adaptor as shown below.
Installation - New Construction (continued) 4 Connect the wire White Green to Green Loosen the short screw (E) and remove the wire cover (F). Pull the house wires through the knockout of wire cover (F). Using the quick connectors to connect 120 V AC house wiring from the wall switch to the fan as shown in the wiring diagram on page 3. Carefully push the connected wires back into the wiring compartment of the fan housing (A).
Installation - New Construction without Flex Bracket CAUTION: Make sure power is switched off at service panel before starting installation. Wear gloves during installing to help protect your hands from injury. NOTE: Ceiling mount only. IMPORTANT: Please remove the tape, which protects the damper during shipping and installation, from the duct adaptor as shown below.
Installation - New Construction(continued) 4 Connect the duct Connect a 6 in. circular duct (not supplied) and vent to the duct connector. Secure it with duct tape (not supplied) or a clamp (not supplied) to make the connection secure and air tight. Insert the duct connector back to the fan housing (A) follow the guide slot from left to right. And it will be in place with a “click” sound. Please secure it tightly. NOTE: If you have to connect to 4in. circular duct, please use a 6in. to 4in.
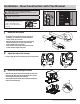
Installation - Existing Construction 1 Remove the existing fan CAUTION: Make sure power is switched off at service panel before starting installation. Wear gloves during installing to help protect your hands from injury. Remove the old fan from the ceiling. IMPORTANT: Please remove the tape, which protects the damper during shipping and installation, from the duct adaptor as shown below. 1 11 0 12.
Installation - Existing Construction(continued) 6 Connect the duct Connect a 6 in. circular duct (not supplied) and vent to the duct connector. Secure it with duct tape (not supplied) or a clamp (not supplied) to make the connection secure and air tight. Insert the duct connector back to the fan housing (A) follow the guide slot from left to right. And it will be in place with a “click” sound. Please secure it tightly. NOTE: If you have to connect to 4in. circular duct, please use a 6in. to 4in.
Installation - Existing Construction(continued) 10 Install the grille with light Attach the grille by squeezing one spring together and inserting the springs into the spring guides in the fan housing (A) firstly. Connect LED wire to the plug in the fan housing. Then insert another spring and push the grille (B) up against the ceiling. Plug Check that the installation is secure and safe from falling objects.
Care and Maintenance WARNING: Disconnect power supply before servicing. See SAFETY INFORMATION before proceeding. Routine maintenance should be done at least once a year. Never use solvents, thinner or harsh chemicals for cleaning the fan. Do not allow water to enter the motor. Do not immerse metal parts in water. Troubleshooting Problem The fan seems louder than it should. Possible Cause Solution The CFM is too great.
Questions, problems, missing parts? Before returning to the store, call Hampton Bay Customer Service 8 a.m. - 7 p.m., EST, Monday-Friday, 9 a.m. - 6 p.m., EST, Saturday 1-800-841-1350 HAMPTONBAY.COM Retain this manual for future use. FCC compliance information is listed as below: Responsible party: Leedarson America, Inc. Responsible party address: 300 Technology Court SE Suite 100, Smyrna, GA 30082 Telephone number: (678) 293-8382 4021V1.
Elemento #317297137 Modelos #LDS-BF3001 GUÍA DE USO Y CUIDADO VENTILADOR LED ¿Preguntas, problemas, piezas que faltan? Antes de volver a la tienda, llame al servicio de atención al cliente de Hampton Bay 8 a.m. - 7 p.m., EST, Lunes-Viernes, 9 a.m. - 6 p.m., EST, Sábado 1-800-841-1350 HAMPTONBAY.COM ¡GRACIAS! Agradecemos la confianza que tiene en Hampton Bay al comprar este ventilador de baño. Nos esforzamos por crear continuamente productos de calidad diseñados para mejorar su hogar.
Índice de contenidos Índice de contenidos ..................................................... 2 Información de seguridad ............................................. 2 Especificaciones del producto ..................................... 4 Instalación típica .......................................................... 4 Diagrama de cableado .................................................. 4 Garantía .......................................................................... 5 GARANTÍA LIMITADA DE POR VIDA .
Información de seguridad Declaración de conformidad del proveedor del apartado 15 de la normativa de la FCC. Número de modelo: LDS-BF3001 Nombre comercial: HAMPTON BAY Responsable: 300 Technology Court SE Suite 100, Smyrna, GA 30082 Tel. : (678) 293-8382 Laboratorio de pruebas: Intertek Testing Services Shanghai Building No.86, 1198 Qinzhou Road (North), Caohejing Development Zone, Shanghai 200233, China Este dispositivo cumple con el apartado 15 de la normativa de la FCC.
Especificaciones del producto ESPECIFICACIONES Flujo de aire: 160 CFM Luz principal: 1500 lm Luz nocturna: 2200K ESPECIFICACIONES Consumo de energía: Ventilador 38W, Luz 20W Voltaje: 120 V, 60 Hz Peso: 13.45 lbs. Diámetro del ducto: 6 in. Requisitos de las dimensiones de la abertura del techo: 12.17 in. (L) x 11 in. (W). Salida de sonido: 1.
Garantía GARANTÍA LIMITADA DE POR VIDA CUÁL ES LA COBERTURA Si este producto falla debido a un defecto en los materiales o en la mano de obra en cualquier momento durante los primeros 3 años después de su adquisición, el fabricante lo sustituirá gratuitamente, con gastos de envío a criterio del fabricante. Esta garantía no cubre los productos que hayan sido maltratados, alterados, dañados, mal utilizados, cortados o desgastados. Esta garantía no cubre el uso en aplicaciones comerciales.
Preinstalación (continuación) CONTENIDO DEL PAQUETE F C E A D B G H Drywall Cutout Template Easy installation Gabarit de découpe pour cloison sèche Installation facile Fan Housing Covering Template Gabarit de recouvrement du boîtier du ventilateur Caution/Attention: Grille enclosed – Do not throw away Installation instructions are included within the grille’s packaging Grille fermée - Ne pas jeter Les instructions d'installation sont incluses dans l'emballage de la grille.
Instalación - Construcción nueva con soporte flexible PRECAUCIÓN: Asegúrese de que la alimentación está desconectada en el panel de servicio antes de comenzar la instalación. Utilice guantes durante la instalación para protegerse las manos de lesiones. NOTA: Sólo para montaje en el techo. IMPORTANTE: Retire la cinta que protege la compuerta durante el envío y la instalación, del adaptador del ducto como se muestra a continuación.
Instalación - Construcción nueva (continuación) 4 Conecte el cable White Green to Green Afloje el tornillo corto (E) y retire la cubierta de los cables (F). Tire de los cables de la casa a través del precinto de la cubierta de los cables (F). Utilice los conectores rápidos para conectar el cableado doméstico de 120 V CA desde el interruptor de pared al ventilador, tal como se muestra en el diagrama de cableado de la página 3.
Instalación - Construcción nueva sin soporte flexible PRECAUCIÓN: Asegúrese de que la alimentación está desconectada en el panel de servicio antes de comenzar la instalación. Utilice guantes durante la instalación para protegerse las manos de lesiones. NOTA: Sólo para montaje en el techo. IMPORTANTE: Retire la cinta que protege la compuerta durante el envío y la instalación, del adaptador del ducto como se muestra a continuación.
Instalación - Construcción nueva (continuación) 4 Conecte el ducto Conecte un ducto circular de 6 pulgadas (no suministrado) y la ventila al conector del ducto. Asegúrelo con cinta aislante (no suministrada) o una abrazadera (no suministrada) para que la conexión sea segura y hermética. Introduzca el conector del ducto de vuelta a la carcasa del ventilador (A) siga la ranura de la guía de arriba hacia abajo. Y entrará en su lugar con un sonido de "clic". Asegúrelo con fuerza.
Instalación - Construcción existente PRECAUCIÓN: Asegúrese de que la alimentación está desconectada en el panel de servicio antes de comenzar la instalación. Utilice guantes durante la instalación para protegerse las manos de lesiones. Retire el antiguo ventilador del techo. IMPORTANTE: Retire la cinta que protege la compuerta durante el envío y la instalación, del adaptador del ducto como se muestra a continuación.
Instalación - Construcción existente (continuación) 6 Conecte el ducto Conecte un ducto circular de 6 pulgadas (no suministrado) y la ventila al conector del ducto. Asegúrelo con cinta aislante (no suministrada) o una abrazadera (no suministrada) para que la conexión sea segura y hermética. Introduzca el conector del ducto de vuelta a la carcasa del ventilador (A) siga la ranura de la guía de arriba hacia abajo. Y entrará en su lugar con un sonido de "clic". Asegúrelo con fuerza.
Instalación - Construcción existente (continuación) 10 Instale la rejilla con luz Fije la rejilla apretando un muelle e introduciendo los muelles en las guías de los muelles de la carcasa del ventilador (A) en primer lugar. Conecte el cable del LED al enchufe de la carcasa del ventilador. Luego inserte otro muelle y empuje la rejilla (B) contra el techo. Compruebe que la instalación es segura y está a salvo de la caída de objetos.
Cuidado y mantenimiento ADVERTENCIA: Desconecte la fuente de alimentación antes de realizar el mantenimiento. Consulte la INFORMACIÓN DE SEGURIDAD antes de proceder. El mantenimiento de rutina debe realizarse al menos una vez al año. No utilice nunca disolventes, diluyentes o productos químicos agresivos para limpiar el ventilador. No permita que entre agua en el motor. No sumerja las piezas metálicas en el agua.
¿Preguntas, problemas, piezas que faltan? Antes de volver a la tienda, llame al servicio de atención al cliente de Hampton Bay 8 a.m. - 7 p.m., EST, Lunes - Viernes, 9 a.m. - 6 p.m., EST, Sábado 1-800-841-1350 HAMPTONBAY.COM Conserve este manual para su uso futuro. Información sobre el cumplimiento de la FCC a continuación: Responsible: Leedarson America,Inc. Dirección: 300 Technology Court SE Suite 100, Smyrna, GA 30082 Tel. : (678) 293-8382 4021V1.