
Instructions / Assembly


9
Installation - New Construction without Flex Bracket
1
Remove the duct connector and wire cover
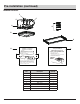
2
Mount the housing to the joist
Bend down 2 tabs (BB) on outside of housing to locate
and position against bottom of joist for proper position.
Secure fan housing (A) through mounting keyholes on
bracket with with 4 screws (D). Make sure bottom of
fan housing will be flush with finished ceiling.
To remove duct connector, pull up on the finger latch, then slide
the duct connector left until until it is removed from the fan
housing (A).
Loosen the short screw (E) and remove the wire cover (F).
NOTE: Ceiling mount only.
BB
F
A
Finger latch
A
3
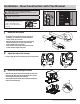
Connect the wire
Pull the house wires through the knockout of wire
cover (F). Using the quick connectors to connect
120 V AC house wiring from the wall switch to the
fan as shown in the wiring diagram on page 3.
Carefully push the connected wires back into the
wiring compartment of the fan housing (A). Reattach
the wire cover (F) and attach it firmly with short screw (E).
CAUTION: Make sure power is switched off at
service panel before starting installation.
Wear gloves during installing to help protect your
hands from injury.
E
HAMPTONBAY.COM
Please contact 1-800-841-1350 for further assistance.
NOTE: Attach the 1/2" ROMEX connector or 1/2 "Flexible Metal Conduit
connector (supplied by others) to wiring compartment cover and lock in
place with 1/2 lock nut included with connector.
Ground- Green or copper wire
Neutral-White to White wire
Line-Black to Black wire
Green to Green
White
Black
Please remove the tape, which protects
the damper during shipping and
installation, from the duct adaptor as
shown below.
IMPORTANT: