
Instructions / Assembly


5 HAMPTONBAY.COM
Please contact 1-855-HD-HAMPTON for further assistance.
Installation
1
Attaching the mounting bracket to the
junction box
□ Remove the preinstalled ball nuts from the mounting unit
(AA) and place them in a safe location.
□ Attach mounting unit (AA) to the junction box (not included)
with mounting screws (BB).
NOTE: The preinstalled support screws on the mounting
unit (AA) should protrude out away from the junction box
with approximately 1/8 in. of adjustability.
BB
AA
2
Making the electrical connections
□ Connect the copper wire on the light xture (A) to the
mounting bracket (AA) by securing it with the preinstalled
ground screw.
□ Connect the black to black (power), the white to white
(neutral) and copper wire to ground wire with the wire
nuts(CC) and secure with electrical tape (not included).
NOTE: If the wires from the xture are the same color,
attach the side with markings or letters to the black
(positive) wire and the other to the white (neutral) wire.
CC
3
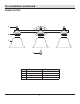
Installing the nial
□ Secure the nials (D) to the light xture (A).
D
A
4
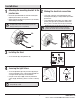
Securing the light xture
□ Secure the light xture (A) to the junction box by placing it
over the preinstalled screws on the mounting unit (AA) and
securing it with the previously removed ball nuts.
□ Using the socket ring tool (DD), remove the preinstalled
socket ring (B), add shade (C) and re-secure the socket ring
(B).
NOTE: Light xture (A) can be installed with the socket
facing either up or down.
A
C
B
DD