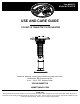
Item #660533 Model # PG169T-B USE AND CARE GUIDE PG169T- B TABLETOP PATIO HEATER Questions, problems, missing parts? Before returning to the store, call Hampton Bay Customer Service 8 a.m. - 6 p.m., EST, Monday-Friday 855-HD-HAMPTON HAMPTONBAY.COM THANK YOU We appreciate the trust and confidence you have placed in Hampton Bay through the purchase of this patio heater. We strive to continually create quality products designed to enhance your home.
Table of Contents Table of Contents .......................................................... 2 Safety Information ......................................................... 2 Warranty ......................................................................... 4 Pre-Assembly ................................................................ 5 Planning Assembly ..................................................... 5 Tools required ............................................................ 5 Hardware Included .
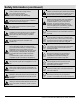
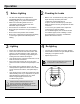
Safety Information (continued) WARNING: Perform a leak test with a soapy solution: (a) To check gas connections. (b) After connecting a new cylinder. (c) Upon re-assembly after disassembly. WARNING: Children and adults should be alerted to the hazards of high surface temperatures and should stay away from the item to avoid burns or clothing ignition.
Warranty ONE-YEAR LIMITED WARRANTY The appliance has been manufactured under the highest standards of quality and workmanship. We warrant to the original consumer / purchaser that all aspects of this product will be free of defects in material and workmanship for one (1) year from the date of purchase. A replacement for any defective part will be supplied free of charge for installation by the consumer. Defects or damage caused by the use of other than genuine parts are not covered by this warranty.
Pre-Assembly PLANNING ASSEMBLY □ □ □ □ To avoid losing any small components or hardware, assemble your product on a hard level surface that does not have cracks or openings. Clear an area large enough to layout all components and hardware. When applicable, tighten all hardware connections by hand first. Once the step is completed go back and fully tighten all hardware. Follow all steps in order to properly assemble your product.
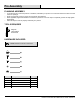
Pre-Assembly PACKAGE CONTENTS Part Description Quantity A B Reflector Heat Insulation Plate 1 1 C D E F G H Top Wire Guard Bottom Wire Guard with Glass Tube Assembly Housing Assembly Plastic Ring Base Glass Cap 1 1 1 1 1 1 I Reflector Spacer 3 6
Assembly 1 □ 2 Assembling the Housing Assembly Remove the door from the housing assembly (E) by lifting the door off the hinges. Insert the bottom of the housing assembly (E) into the top of the plastic ring (F) and attach to base (G) with M4 x 10 bolts (CC). Reattach the door to the housing assembly (E). □ □ Assembling the Bottom Wire Guard with Glass Tube Assembly Attach the glass cap (H) to the bottom wire guard with glass tube assembly (D) using Ф4 washers (DD) and M4 nuts (EE).
Assembly (continued) 4 □ 5 Assembling the Reflector Place the heat insulation plate (B) onto the reflector spacers (I), then attach the reflector (A) to the reflector spacers (I) using acorn nuts (AA). □ 8 Assembling the Cylinder Open the door on the housing assembly (E), turning the connection end of the preassembled regulator to face outward. Attach a 1 lb. LP-gas tank (sold separately) to the regulator. Then, turn the regulator until the tank is in an upright position. Close the door.
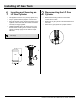
Installing LP Gas Tank 1 □ □ □ □ 2 Inserting and Securing an LP Gas Cylinder This appliance uses a 1 lb (16.4 oz) cylinder only. Only a cylinder marked “propane” can be used. Align the threads on the canister with those on the regulator, insert and rotate the canister clockwise until they fit snugly together. HAND TIGHTEN ONLY. Be careful not to cross threads when screwing in the canister. Keep the cylinder vertically upright on the base for vapor withdraw.
Operation 1 □ □ □ □ □ □ 2 Checking for Leaks Before Lighting The item was designed and approved for OUTDOOR USE ONLY. DO NOT use it inside a building, garage or any other enclosed area. Make sure surrounding areas are free of combustible materials, gasoline and other flammable vapors or liquids. Ensure there is no obstruction to air ventilation. Be sure all gas connections are tight and there are no leaks. Be sure the access panel is clear of debris.
Operation (continued) 5 □ □ □ □ 6 During Heater Operation The emitter screen will become bright red due to intense heat. The color is more visible at night. The burner will display a blue flame. These flames should not be yellow or produce thick black smoke, indicating an obstruction of airflow through the burners. If yellow flame is detected, turn off the heater and gas supply and refer to the Troubleshooting section.
Care and Maintenance (continued) CLEANING □ □ □ □ Wipe surfaces clean with mild dish detergent or baking soda. For stubborn surfaces use a citrus-based degreaser and a nylon scrubbing brush. Rinse clean with water. Use high-quality automobile wax to help maintain the appearance of the heater. Apply to exterior surfaces from the pole down. Do not apply to emitter screen or domes。 NOTE: While cleaning your unit, be sure to keep the area around the burner dry at all times.
Troubleshooting Problem The burner does not stay lit. The burner does not light. Note: Heater operates at reduced efficiency below 40°F. Possible Cause The thermocouple is not operating correctly. Prevention/Cure Replace the thermocouple. 1. 2. 3. 4. 5. 6. The burner flame is low. 1. The gas pressure is low. 2. Outdoor temperature is less than 40°F and the cylinder is less than 1/4 full. 3. The control knob is not fully "ON" or there is a blockage. 1. The gas pressure is low. 2.
Service Parts Part Description Quantity Part Description Quantity AA A Acorn Nut Reflector 3 1 D4 DD Glass Tube Ф4 Small Flat Washer 1 4 B BB C CC Heat Insulation Plate ST 4.
Questions, problems, missing parts? Before returning to the store, call Hampton Bay Customer Service 8 a.m. - 6 p.m., EST, Monday-Friday 855-HD-HAMPTON HAMPTONBAY.COM Retain this manual for future use.
Núm. de artículo 660533 Núm. de modelo PG169T-B GUÍA DE USO Y CUIDADO CALEFACTOR DE PATIO DE MESA PG169T-B ¿Tiene preguntas, problemas, o faltan piezas? Antes de regresar a la tienda, llame a Servicio al Cliente de Hampton Bay de lunes a viernes de 8 a.m. y 6 p.m., hora local del Este 855-HD-HAMPTON HAMPTONBAY.COM GRACIAS Agradecemos la confianza que ha puesto en Hampton Bay a través de la compra de calefactor de patio.
Tabla de contenido Tabla de contenido ....................................................... 2 Información de seguridad ............................................ 2 Garantía .......................................................................... 4 Pre-ensamblado ............................................................ 5 Planificación del ensamblaje ...................................... 5 Herramientas requeridas ............................................ 5 Herraje incluido ......................
Información de seguridad (continuación) ADVERTENCIA: Los niños y adultos deben ser alertados de los peligros de las altas temperaturas superficiales y deben permanecer lejos del calefactor para evitar quemaduras o ignición de la ropa. PELIGRO: Nunca llene el cilindro más allá del 80 por ciento de su capacidad. ADVERTENCIA: Realice una prueba de fugas con una solución jabonosa: (a) Para revisar las conexión de gas. (b) Después de la conexión de un cilindro nuevo.
Garantía GARANTÍA LIMITADA DE UN AÑO El aparato ha sido fabricado bajo los más altos estándares de calidad y mano de obra. Garantizamos al comprador/consumidor original que todos los aspectos de este producto estarán libres de defectos en materiales y mano de obra durante un (1) año a partir de la fecha de compra. Se proporcionarán repuestos de cualquier pieza defectuosa libre de cargos de instalación por el comprador.
Pre-ensamblado PLANIFICACIÓN DEL ENSAMBLAJE □ □ □ □ Para evitar perder algún componente o herraje pequeño, ensamble su producto sobre una superficie nivelada y dura que no tenga grietas ni aberturas. Despeje un área suficientemente grande para disponer todos los componentes y herrajes. Cuando corresponda, apriete primero a mano todas las conexiones de herrajes. Una vez haya completado este paso vuelva y apriete por completo todo el herraje. Siga todos los pasos para ensamblar adecuadamente su producto.
Pre-ensamblado CONTENIDO DEL PAQUETE Pieza Descripción Cantidad A B C Reflector Placa de aislamiento de calor Protección del cable superior 1 1 1 D E F G H I Protección del cable inferior con ensamblaje de tubo de vidrio Ensamble de la carcasa Anillo plástico Base Capuchon en verre Separador del reflector 1 1 1 1 1 3 6
Ensamblaje 1 Ensamblaje de la carcasa □ 2 Quite la compuerta del montaje de la caja (E) levantándola de las bisagras. Introduzca el fondo del montaje de la caja (E) en la parte superior del anillo de plástico (F) y ajústelo a la base (G) con tornillos M4 x 10 (CC). Vuelva a fijar la compuerta al montaje de la caja (E).
Ensamblaje (continuació n) 4 □ 5 Ensamblaje del reflector Coloque la placa de aislamiento de calor (B) sobre los separadores del reflector (I), luego instale el reflector (A) en los separadores del reflector (I) usando tuercas ciegas (AA). □ 8 Ensamblaje del cilindro Abra la puerta en el ensamblaje de la carcasa (E), girando el extremo de la conexión del regulador preensamblado para que mire hacia afuera. Instale un tanque de gas PL de 1 lb. (vendido separadamente) en el regulador.
Instalación de un tanque de gas PL 1 □ □ □ □ 2 Cómo insertar y asegurar un cilindro de gas PL Este aparato usa un cilindro de 1 lb (16.4 oz) únicamente. Solo puede ser usado un cilindro marcado "propano". Alinee las roscas en la lata con las del regulador, inserte y gire la lata hacia la derecha hasta que quede bien ajustada. APRIETE A MANO SOLAMENTE. Tenga cuidado de no cruzar las roscas cuando atornille en la lata. Mantenga el cilindro verticalmente en la base para permitir que los vapores escapen.
Operación 1 □ □ □ □ □ □ 2 Comprobación de fugas Antes del encendido El artículo fue diseñado y aprobado para USO EN EXTERIORES SOLAMENTE. NO lo use dentro de edificios, garajes, o cualquier otra área encerrada. Asegúrese de que las áreas circundantes estén libres de materiales combustibles, gasolina y otros vapores y líquidos inflamables. Asegúrese de que no hayan obstrucciones en la ventilación del aire. Asegúrese de que las conexiones de gas estén apretadas y que no hayan fugas.
Operación (continuación) 5 □ □ □ □ Durante la operación del calefactor La pantalla del emisor se pondrá rojo brillante debido al intenso calor. El color es más visible durante la noche. El quemador mostrará una llama azul. Estas llamas no deben ser amarillas ni producir humo negro grueso, indicando una obstrucción del flujo de aire a través de los quemadores. Si se detecta llama amarilla, apague el calefactor y el suministro de gas y consulte la sección Resolución de fallas.
Cuidado y mantenimiento (continuación) LIMPIEZA □ □ □ □ Limpie las superficies con un detergente lavaplatos suave o bicarbonato. Para superficies persistentes, use un desengrasante basado en cítrico y un cepillo para fregar de nylon. Enjuague con agua limpia. Use cera automotríz de alta calidad para ayudar a mantener la apariencia del calefactor. Aplique a las superficies exteriores del poste hacia abajo. No lo aplique a la pantalla del emisor ni a los domos.
Resolución de fallas Problema El quemador no permanece encendido. El quemador no enciende. Nota: El calefactor opera a eficiencia reducida abajo de 40°F. Posible causa El termopar no está funcionando correctamente. Prevención/Cura Reemplace el termopar. 1. 2. 3. 4. 5. 6. La llama del quemador es baja. 1. La presión del gas está baja. 2. La temperatura de exteriores es menor de 40°F y el cilindro está lleno a menos de 1/4 de su capacidad. 3.
Piezas de servicio Pieza Descripción Cantidad Pieza AA A B BB C CC Tuerca ciega Reflector Placa de aislamiento de calor Tornillo ST 4.
¿Tiene preguntas, problemas, o faltan piezas? Antes de regresar a la tienda, llame a Servicio al Cliente de Hampton Bay de lunes a viernes de 8 a.m. y 6 p.m., hora local del Este 855-HD-HAMPTON HAMPTONBAY.COM Conserve este manual para uso futuro.
16