
Instructions / Assembly


7 HAMPTONBAY.COM
Please contact 1-855-HD-HAMPTON for further assistance.
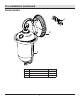
Maintenance
REPLACING THE LED DRIVER
IMPORTANT: Do NOT disassemble product. This operation
is only for replacement of a faulty LED Driver.
This is NOT a step to be taken with installation of this
fixture.
IMPORTANT: It is recommended that the replacement of an
LED driver be completed by a qualified electrician.
CAUTION: Turn off main power at the fuse or circuit
breaker box.
Disassembly:
1. Use a Phillips screwdriver to remove the (4) screws in the glass
shade assembly housing.
2. Use a Phillips screwdriver to remove (2) screws holding the LED
face plate to the housing.
3. Disconnect wires from the LED faceplate to the driver via the quick
connect terminal.
4. Use a Phillips screwdriver to remove (2) screws holding the LED
driver to the housing.
5. Unthread the photocell from the clear lens on the housing.
6. Cut the black and white wire immediately below the pigtail
connectors to remove the connectors.
7. Strip each colored wire 3/8 in. from the end of the wire.
8. Attach the new LED driver to the black and white supply wires
with wire nuts or crimp connectors.
Reassembly:
9. Screw the photocell back into the clear lens.
10. Use a Phillips screwdriver to attach the driver to the housing using
(2) previously removed screws.
11. Reconnect the driver wires to the LED faceplate wires with quick
connect terminal.
12. Use a Phillips screwdriver to re-attach the LED face plate to the
housing using the (2) previously removed screws.
13. Use a Phillips screwdriver to re-attach the glass shade assembly
to the housing using the (4) previously removed screws.
14. Restore power to the fixture.
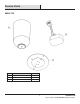
Driver Replacement:
Model # 2003230